Today I was able to make some pretty good progress on the Wing Cradle. I am going through the trouble of detailing this because Vans drawings for this are horrible, and because I only seem to get a lot of pics from other build sites, but no details on how exactly this thing is put together.
The next step was to attach the bottom 2x4 supports to each of the panels. I started by drawing the center line (18 inches) down each panel. I then took each of the 2x4s and clamped them in place, screwing them to the panel while keeping in mind clearance for additional screws that would be added later for attaching additional cross member supports on the corners of each panel.
I staggered the screws for the bottom 2x4, which is placed flush against the bottom of the panels.
Once the first 2x4 is secured to the bottom of the panel, I flipped it over and placed the second 2x4 into the position shown below:
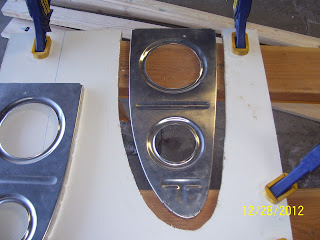
I screwed this bottom board into the other 2x4, and then took a W709L and W709R end rib and used it as a template to draw the outline for the leading edge panel of the wing cradle.
I placed the wide end flange of each rib flush with the top of the panel and drew the lines. Vans offers no dimensions in the plans as far as the spacing between the ribs is concerned, so I took a guess from looking at the drawings in the plans and from other pics of completed cradles from other builders. The concern was the amount of space on the outer edges of the top of each panel, since there would not be a lot of material there. I ended up with about 3-4 inches on each outer edge after I removed additional wood to account for the width of the carpet that will be inserted in each cut out to cushion each wing leading edge.
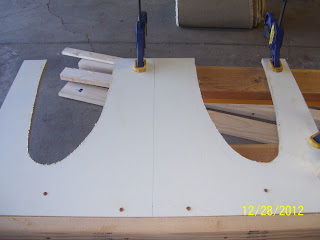
The next shot is a 3/4 inch extension to the lines drawn around each of the ribs. This is the additional amount of space I added to each cutout to allow for the thickness of the pile carpet remnant I have had lying around in the garage for years now. I used the ruler to make marks around the drawn edges and then connected them via freehand as best I could. This should leave enough space to add the carpet to each cut out, and provide some measure of shock absorbtion to the leading edge of each wing while it rests in the cradle.
Both cut outs are ready to be cut with the jigsaw
And here are the cut outs after some relatively quick work with the jig saw:
Next are pics of the carpet remnant I intend to use:
And finally I fast forward a bit to show the 8 foot long 2x4 center support attached to both panel ends, and I managed to get 3 of the 6 total support brackets mitered and attached to one side of the cradle.
The support brackets were measured as follows:
The two side supports were between 24 3/8 inches and 24.5 inches long, mitered at 45 degrees on both ends. One side attaches to the inner 2x4 panel support, and the other end is attached to the center 2x4 as shown above.
The center vertical panel support was cut from a remnant 2 foot long 2x4, again mitered at 45 degrees and secured with screws - the top side was drilled and screwed from the outer side of the panel, and the bottom attach point was into the top of the long center 2x4 support.
ALl that remains is the 3 cross members for the other side of the cradle, the cut outs for the main wing spar ends on the other panel, and adding the carpet and the cut outs on both panels, as well as the furniture dollies to the bottom of the frame. SHould be able to finish it up tomorrow morning.
Subscribe to:
Post Comments (Atom)


No comments:
Post a Comment