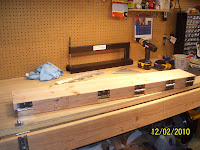
Warning! Anyone that is building an RV7 or different model of RV will be performing a different procedure to complete the Rudder trailing edge. This is because the RV7 uses a two piece skin and a metal wedge to form the trailing edge of that rudder. The RV 8 has a one piece rudder skin that has a partially bent traling edge that must be finished after the stiffeners have been riveted to the skin.

To accomplish the final bend, you need to build another homemade tool called a bending brake. It is basically nothing more than two long pieces of 2x8 attached with 3 inch hinges from HD. My math skills are a little lacking as I tried to determine the precise centerline placement of 5 hinges on a 49 inch long board. so I divided 49 x 5 and came out with about 9.8 inches. So I measured out 9.8 inches from one end of the board, and started attaching the 5 hinges, only to realize that I needed a 6th hinge based on the measurements I had taken. So this turns out to be a "divide by and add one more" scenario. You can see the remaining spot for the missing hinge in the top photo. My only concern now is that I don't continue to make this same mistake when I have to measure and layout rivets on other parts of the build. Oh well, one more trip to HD and she'll be ready to go.
You basically open the brake wide enough to insert the rudder skin trailing edge, leaving about 1/2 to 3/4 inch gap between the skin and the hinges of the brake, and then you "wanker" down on it" as the aussies would say, until you achieve the final bend. The trick is to make this bend as straight as possible, and to keep from bending it too far. I was very concerned about this because the plans lack any detail about the expected radius of the trailing edge after the bend is made.
I decided to turn to my eldest son for help. He is about to graduate high school, and has completed several college-level math and science honors courses. I wanted to determine a bit more definitively what the finished angle and corresponding height measurements of a specific point would be, to help me determine appoximately how far to apply the bend. I told him the front spar would measure about 3 inches high at it's widest point, and the skin width was about 20 inches. We also figured that the point where the leading edge of the skin attaches to the front spar is close to a right angle (90 degrees). This is not entirely accurate, but was good enough to apply some formulas for experimental purposes. He applied some trigonometric functions and determined that the finished angle would be about 8.53 degrees, and that the height of the front edge of the bending brake should be about 1.2 inches high when the bend is completed. You are not supposed to have anything attached to the leqading edge when you perform the bend, and I was concerned about knowing when to stop bending. That is why I wanted some measurements to go by. I am just simply amazed that there are mathematical ways to apply some precision to this task without it being such a guessing game.
Vans also told me that the radius of the rudder trailing edge bend should be about 3/32 of an inch, and explained that the distance of the trailing edge from the hinged-edge of the brake will need to be shorter or longer if you choose to shim the hinged edge of the brake up a bit to prevent bending the trailing edge too far, as some builders have also done. I am still concerned that I will need to tweak the bend a little after it is attempted, since many others have needed to perform additional fine-tuned bends using other hand tools like a hand seamer. I would rather it be done without the need to "tweak" anything, but I certainly don't want to ahve to order a new rudder skin either. Nerve-racking stuff when you have never actually done it before, but I'll get through it.
When I get closer to actually performing this step I will refine and double check the math numbers to ensure they are correct, and then we will see if it works......
No comments:
Post a Comment