Tuesday, August 21, 2012

Wings 84, Total 547 - Deburring Leading Edge Ribs

And the never ending Wing rib deburring process commences. I finally got the window in my trailer repaired, and so I took some time to get that re-installed on the trailer. Afterward, I was able to spend about an hour smoothing out the forward cut out sections of some of the leading edge ribs. Vans explains in the instructions to ensure that the contours of the front end of the nose ribs are smooth. IN their raw form, if you rin your fingers over this section of the rib, you can feel the uneven-ness of each of small sections of each cutout. I used a combination of the scotchbrite wheel and some aluminum oxide 220 grit sand paper to make these sections as smooth as I could without compromising too much metal.

Doing this allows the nose ribs to be positioned and aligned with the holes in the skins without getting caught on the skin surface. I did reduce the thickness of the the metal on some of these cutouts to accomplish this, but it was necessary to achieve a reasonably smooth surface over that part of the rib.

Here are some pics of the process:


I did quite a bit of surfing VAF last night to find out more about what type of Conduit connectors are available for use in setting up my wire runs for each wing. I will post more about that tomorrow.

Sunday, August 19, 2012

Wings 83, total 546 - Back in the Saddle Again......

Besides being a great Aerosmith tune, my post title is a true testament to the way of things. Seems like I had been out of the saddle for quite some time, but the reality is that I have still been immersed in many things regarding my build, just no actual time spent actually building it lately. To accentuate my lack of progress over the past month or so, I ahve to inclde this next pic. To other builders out there, let this pic serve as "motivation," or you can look at it from my perspective, which is an embarrasing kick in the pants to get this flying machine finished as soon as possible.


Thanks goes once again to Mike Rettig for this lovely work of art, written on my dust-filled horizontal stabilizer, that I have not hung back up on the wall since my build party a couple (few) months ago. I stil have some touch up priming and a couple other things to do before I hang it back up again. Sadly, it does not take very long for just about anything in my garage to accumulate a rather thick coat of dust. I am ashamed to have let it get this bad.

Since my last post I have suffering from a  bit of analysis paralysis regarding how many additional holes I need to drill in my wing ribs to install the necessary conduit to run all of my electrical wires through the wings. In order to figure this out, I also needed to come to terms with some avionics decisions that would also determine what kind of electrical wires and antenna wires I would need to run.

One of the key decisions you have to make in this day and age is to determine if your airplane will fly using mainly GPS navigational assistance, or if you intend to continue to take advantage of the VOR,Localizer, and glide slope information that is still in use and available to both VFR and IFR pilots alike. My decision? Since I am a pilot that is rated to conduct flight in both VFR and IFR environments, I plan on being able to exercise either one when the opportunity suits me. I threfore plan on installing a GPS unit that is qualified for both enroute and approach IFR (WAAS capable), and, as an independent back up system, I plan to to continue to use, or have the capability to use the existing ground-based VOR navigation system. 

In order to do this, you have to install the avionics equipment for each system, and run the electrical wiring and the antenna wiring for both.

Up to now, my experience with VOR antennas has always involved what is known as a cat's whisker antenna. This is basically a rather thick wire antenna that is shaped like two sides of a triangle with the base missing. The pointed end of the antenna is usually mounted on the top of the vertical stabilizer, with the "whiskers" spreading outward towards the rear of the airplane. THe traditional IFR installation for this system was to install two separate VOR receivers, both of which would be tied to the same antenna. I don't see too many experimental aircraft using this installation method, nor do I see many cat's whiskers antennas.

I have since learned of a different option that was introduced by an antenna whiz by the name of Bob Archer. He has invented some Nav and Com antennas for a variety of different airplanes that can be installed inside a Wing tip, thus reducing drag and allowing faster cruise speeds. I have seen many pics of this antenna and I have access to several builders who have used this same installation. This weekend I attended the annual EAA Chapter 301 picnic, complements of Rudy Kniese and Ted Lemen. While there I met Lyn (Will get last name and add later) who is building an RV-7A. He invited me to look at this Wings so that I could see how he had routed his wires nd so I could see the Archer antenna installation in his WIng tip. It was fantastic to see another build again. I learned so much more than just about wire runs while I was there.

I learned about the distinction between fuel injected engines with vertical induction vs. horizontal induction. Horzontal requires an inlet mod that most make out of fiberglass. This eliminates the need for the scoop on the bottom of the engine cowl, which still has to be used if you use vertical induction. I also learned about the routing of the fuel vent lines, placement of the engine cooling baffles, and directing airflow to various components within the engine compartment.

Anyway, back to antennas. One of the other things I had read somewhere was that the antenna needs to be run separately from the wires for nav and strobe lights, landing lights, autopilot servos, etc. It is also supposed to be at least 1 foot away from all other wires to prevent RF interference from distorting or disrupting the signal. Lyn showed me that he as able to run the main wiring bundle for the lights and such up toward the front of the main ribs, and the VOR antenna cable can run through some conduit that is attached by a hangar through the rear lighteining hle of each rib. Lyn had a very spiffy looking zip tie clamp that was riveted to the outside of the rear lightening hole with two rivets. THe conduit is then attached by a zip tie assembly. Very neat setup. I also found some other hangars today at HD that I had read about from several others. the 3/4 inch hangar should work just fine. THis puts the conduit right through the center of the rear lightening hole, so you don't even have to drill another 3/4 inch hole in your wing rib, which is also a plus. The antenna cable will also be at least 16 inches away from any other wiring through the wing, so this will work nicely.

The antenna cable being used these days is RG400 - really expensive stuff I guess, but my life and the lives of my passengers is worth it. My plan is to run the Nav antenna out to the right Wing tip, another comm antenna out to the Left Wingtip, and then most all remaining antennas except for the GPS antennas will go on the belly of the airplane.

TO close for the night, I spent two hours finishing up the straightening of the remaining fuel tank ribs, and I sorted all the main ribs and stacked them together so that the correct rib sequence is set for each wing. I then numbered each rib so I know which one goes where. I still have deburring that needs to be done to certain areas of each rib, but the hard part is over. Actually the next hard part will be all the scuffing and cleaning of the ribs, but first I get to match drill the holes to the spar - have to get the sapr down off the shelf to do that. Yippee, I am building an airplane again!


Stacks of ribs waiting to be attached to the wing spar.

Saturday, August 11, 2012

If you missed Airventure, you missed...(Cont'd)

Continuing from the previous post. Just had a few more things I wanted to mention about the Airventure Experience this year.

- One of the challenges for folks with kids, especially older kids, is what they can do while attending Airventure. This has been identified in feedback received from those that attend AV. Turns out that our new EAA president also has teen-aged kids, and therefore wanted to focus on that concern a bit more this year. There were some neat changes this year. Part of the package of materials you receive when you enter the campground was a notice about a schedule of events for teens, and this included several meet and greet, Pizza parties, and Bon fires at the volley ball courts throughout the week. Unfortunately, the bon fires could not take place, because of a fire ban in Wisconsin due to drought conditions. (Something I know about all too well this year in Colorado) Regardless, they still met at the courts and had a good time.

My son met several new friends that were his age, which I was happy to see. I also learned something new about the association that EAA has with the YMCA in Oshkosh during the event. There is actually a shuttle bus that runs each day between Airventure and the YMCA. Kids less than 10 years old must be accompanied by an adult, but others can go to the Y without an escort. Bus leaves at 1230 each day and returns at about 3:30 or so. This service is free of charge, and the YMCA in Oshkosh is second to none. It even has a full ice skating rink. Adam took advantage of this a couple of times to go play basketball. I also learned from one of the grown ups that they also allow people flying into Airventure to camp on the soccer fields at the Y. campers have full access to allthe ammenities at the Y, including restrooms, showers, etc.

For the trip up and back, and the few times I saw my son during the event, being able to spend time with him was priceless. He is not an aviation enthusiast as I am, but he has enjoyed each of these past two trips. I am hoping I can share a couple more with him before adult life and work and money and girls take over.....

If you are looking for a way to bond with family, Airventure is an excellent way to do that.

- You missed catching up with old friends, or making new ones from all over the world. Mike Rettig introduced me to a group of RV 10 builders that were in the group camp area of Camp Scholler, which is much closer to the main grounds entrance then I am. These were great folks, and the meet and greet pot luck dinner was fantastic.

- Then there was the "after party" back at my trailer where Mike and I proceeded to do a little card playing and drinking. I was consuming some Batch 19 Pre-Prohibition beer from Coors that Scott Mills graciously provided for me as compensation for hauling his gear to OSH and back. Thanks Scott! Then I introduced Mike to a drink with an interesting history that I call the "El Supremo". Sorry, if you want to know more about that drink, you'll just have to travel to Airventure and meet up with me to find out! Needless to say that we were a little snockered by the end of the evening. After a rather tough journey, and some equally tough weather conditions after we arrived, I was in need of some "relief." Thanks Mike.

- I need to take some time to recognize Mike just a bit further. Other than being a great drinking buddy, MIke deserves honorable mention for a hst of other reasons. Earlier this year a series of events unfolded after he became acqainted with a young man by the name of Alex Cuellar, who had aspirations of becoming a pilot. His dreams were suddenly shattered when he was diagnosed with a rare brain tumor. After Alex had visited Mike's RV-10 project, Mike asked Alex if he had ever been to Airventure. A seed had been planted. Then, after hundreds of events and phone calls and inquiries later, this young man and his falther, Allejandro, were on their way to an all expense paid trip to Airventure.

While many folks became involved to make this all happen, Mike was the corner stone that started it, and then coordinated most of the efforts to make it all happen. The VAF community also came together for this young man, who is still recovering from chemo-therapy and fighting for his very life to this day. It was absolutely awe-inspiring to see what a group of people with different aviation-oriented interests and backgrounds could do in just a matter of a few months to make a young man's dream come true. I am very proud to be a member of an organization such as EAA and Vans Air Force, and to know the wonderful people that make up these organizations. Mike - you are tops in my book.

You can see more info about his trip by clicking here.

Just to give a glimpse of some of the things that Alex was able to experience:

1. Transported in RV style to and from Airventure by an RV-10. Thanks Dwight.
2. Interviewed on EAA radio. You can listen to that interview online here. (Note that as of this posting the 2012 AV interviews do not appear to be available quite yet. I am sure they are working on them, so just be patient.)
3. Was introduced and received a standing ovation at the Vans Banquet
4. Got to meet director George Lucas prior to the screening of the Red Tails movie at the Fly In Theater.
5. Got to ride in the B-29 Fifi (Something that I was seriously considering doing this year until vehicle repairs ate up the funds I had budgeted for that.)
6. Got to tour the Airventure grounds and the Museum in style with a golf cart and transportation arranged by EAA. Thanks Chad Jensen and others).

And that is just a taste of what they experienced...... I was blessed to meet Alex and his dad several times throughout the week. I truly wish the best for Alex and his family, and I pray for his full recovery so that he may continue to pursue his dream to be a pilot someday. Cancer sucks.

Mike, you are truly inspirational for your selfless devotion to making this happen. Thank you for all that you did for Alex and his family.

This was probably the highlight of my week - watching a young man get an experience of a lifetime.

- As a parting remeberance for this post, on the last day of the event, I also watched in amazement as a young girl at one of the concession stands proceeded to make the tallest soft serve ice cream cone I have ever seen. By the time she was done, tis thing was at least one foot tall. As she handed it to me, I kept wondering how in the heck I was going to eat this humungous thing. One thing about me, when it omes to ice cream, I will find a way. I managed to down that thing in a matter of minutes, without spilling a drop. This was followed almost immediately by a though from that oldTV commercial that goes something like "I can't believe I ate the whole thing!" Took some more walking to recover from this amazing feat, but that is never a problem when at Airventure, sinec the average person walks about 7 miles per day while they are here.

So, are you going to go to Airventure 2013, or are you going to keep dreaming about it? Make it happen!

Tuesday, August 7, 2012

If you did not attend Airventure this year, then you missed.....

Now that I have adequately vented about all the less-than-pleasant things that happened on this latest trip to Airventure in Oshkosh, Wisconsin, I need to be sure to point out to anyone reading these small slices of my life, that the good times still far outweighed any of the not so good times. Part of the process of going to Airventure is experiencing the journey along the way. Without the journey, the destination would never be reached. The process of building an airplane is no different.

So, to begin with, if you did not make it to Airventure this year, you missed.....

- A great opening day concert with the Steve Miller Band - absolutely awesome show.

- Quiet time to reflect in the Museum - On the hottest day of the week, I sat down in a chair in air conditioned comfort that faced a quiet wall with several pictures of nose art on some aircraft of pilots in WWII from around the region, each with a story about the pilot behind the art. Some survived, and some did not.... Thank you all for your sacrifice. The museum is one of my favorite places to go - hot or cold, rain or shine.

- Watching Team RV perform for the first time at Airventure to honor the founder of Vans Aircraft - Dick Van Grunsven - 20 or 30 some odd RV aircraft, all built by their owners, performing one of the best mass aerobatic performances I have ever seen - truly inspirational stuff.

- Re-enactments of the Pearl Harbor Invasion by the Tora Tora Tora flight from the CAF. I have not seen this re-enactment for many years, but it was still a haunting experience to see just how quickly the Japanese airplanes can turn and re-engage in the attack. The aircraft that are used were replicas built from original plans for the original 1970s movie called Tora Tora Tora.

-  or perhaps you missed the antitheses of that attack that occurred on August 6, 1945, over Hiroshima, as demonstrated here......


- You missed the Vans banquet on Tuesday evening. Admittedly I had a hard time finding this pavilliion which is cleaverly hidden behind several trees and slightly out of sight from the main roads, but once we got there, it was a fantastic experience. Members of Team RV, Vans Staff, and at least 3 hundred other RV-owners, builders, and enthusiasts all came together for food, drink, stories, and just good times had by all.

- You missed the introduction of the new RV-14. This airplane turned out to be a cross between the RV-10 and the RV-7, with a cabin area about 2 inches wider than the RV-7, and wings that hold larger fuel tanks for better cross country endurance. The airplane is also still fully rated for aerobatics. Finally, an RV-7 for big folks, like me. Gotta finish the RV-8 first though!

 - Or maybe you missed the movies at the Ford Fly-in Theater. I absolutely love this feature about Airventure. Drive In movies every night with out the cars - just you, your chairs, free popcorn, and perhaps a favorite beverage, all while sitting under the starsv-just beautiful. This year you missed 633 squadron, 30 seconds over Tokyo, Star Trek, The Rocketeer, Red Tails, and one other one that escapes me at the moment.

- Forums and seminars and workshops galore. If you have questions about how to do something, this is certainly the place to ask the questions and get the correct answers. Due to all the car adn trailer issues I was not able to attend all of the forums that I wanted to, but I did manage to attend the RV Composite Workshop, and part of the discussion about ForeFlight and its product offerings for EFB solutions in the cockpit, as well as one other forum that discussed the future of the unleaded fue movement that will invariably keep heading our way. (Stupid ass tree huggers) - there, now you know my unedited opinion about all that stuff. But I digress....

 - If you did not make it to the Saturday night Airshow, then maybe you missed the most awesome fireworks and night airshow on the planet. Here is a snippet of that to wet your appetite for next year.


- Or perhaps you missed the opportunity to walk amongst a literal sea of homebuild aircraft all over the grounds. I am happy to report that there were reportedly between 475 to 500 RV aircraft present at Airventure this year, once again breaking a record previously held by Cessna for the largest number of same - make aircraft that have landed at Airventure. RVs rule! There are currently about 7700 reported kits currently flying in all parts of the world.

Here are some pics that I took while roaming the grounds:


- Or you may have missed the Old and new flying together. Glacier Girl - a P-38 Lightening dug out of hundreds of feet of ice and fully restored and flying, teamed up with an A-10 Tunderbolt, aka Warthog.


And as if that is not enough..... To be continued......

Friday, August 3, 2012

Survived Another Airventure

Not a very thrilling title for a post about traveling to the worlds greatest aviation gathering, but as I sit here writing this I am still in recovery mode after returning to a busy work week for the past couple of days. This trip was a challenging one on many different fronts. The journey getting there always holds some interesting challenges, and this year was no exception. Not posting any pics on this post as I spent most of my time taking video. Will try to capture that and put some clips on at a later time.

Everything kind of broke down as follows:

1. Did not get underway until 10:00am due to the usual "must work till midnight the night before to save the world" syndrome, which did not leave me enough time to finish packing up the night before. Then, through no fault of his, after simoly following my instructions, my son opened up the water fill port to fill the water tanks in the trailer, but he opened up the wrong one - the one with absolutely nothing hooked to the other side. Why my trailer is configured like this I will never know - it came that way when I bought it. So that flooded the trailer from front to back before I finally saw what was happening. So not the best start I have ever had.

2. Rolled into Omaha at about 7;00PM after a 10 hour drive - stayed in a nice Motel 6 this time due the extreme heat and humidity in that region right now. It was 104 with an index at 109 degrees when we pulled up, only to find that the entire business side of the street that we were on had experienced a power outage only 15 minutes before I arrived. After a mad scramble to find a gas station that still had power, the other side of the street lit up again, and so we checked into the hotel with no further problems.

3. On I-80 the next day about 20 miles west of the I-380 North interchange, my left rear trailer tire completely blew out. In the process it severed all of my trailer brake wires leading to one side of the trailer (See my post from 2009 for a similar experience), and it also completely ripped out the handle of one of my dump valves for one of the water tanks. I have to say I was in fear for my life while changing that tire on the side of the higway while countless numbers of semi trucks moving at 80 mph just a few feet away. The tire had completely blown apart, and the tread had wrapped itself around the axle about 5 times while it proceeded to do the rest of the damage I have already described.

So I got the spare tire on and off we went again, but I was very nervous that we might experience another blowout, so I was a bit on edge for the rest of the trip. As a side note, after I arrived at Oshkosh, I learned how to determine when my tires were manufactured. When I found the DOT date stamp, it indicated that they were all made in June of 1995! IN other words, my trailer tires were about 7 years overdue for a change based on normal operation, and 4 of those 7 years had been spent traveling to Oshkosh and back. They also determined that the other 3 tires were starting to separate, indeed about ready to give way, so I consider myself a bit lucky there. Should have replaced the tires long ago...... live and learn I guess. I always check the tread before I depart but did not pay attention to too much else, like the conidtion of the tire skin in between the treads, etc. Normal life span is about 8-10 years.

4. Oshkosh was also HOT when we arrived, and it was also very humid. I had a real hard time with the weather this year. A couple of days were nice, but the remainder were either rainy, windy, or extremely hot. One storm that came through on Thursday last week had me personally fearing for my life for about 15 minutes, resulted in damage to at least 2 aircraft that I witnessed, and flooded out just about all tents in the homebuilt camping area. Luckily the strong part of the storm was over the Airventure grounds and not so much in the campground area, so the trailer survived that with no problems.

5. Had an episode where a cabinet door gave way and swung out so hard that it broke one of my windows. I had to get creative with Gorilla tape and carboard box and a plastic trash bag to board it all up for the trip home, since I was not successful finding a place that could fix my window up there in Oshkosh. I am still in the process of getting that repaired.

6. If you ever haul an RV up to Oshkosh, remember a company called Quent's Service Center. THis was the place that the EAA Check in folks referred me to when I walked up to them the day after my arrivial with no idea who to contact to try to get some things fixed while I was there. These guys were fantastic, and were able to get me 4 new tires and even came out on site to my location in Camp Scholler to fix the trailer break wires. Yeah I left there with a little less cash in my pcoket than I had originally planned, but they really helped me out quite a bit.

So, as far as the journey was concerned, were there some challenges with getting up there this year - you bet there were. Will that deter me from doing it all over again next year - probably not. There were so many really cool things going on at AV this year that I can hardly wait to see what is in store for next year. I'll recap some of the highlights in another post.

Wednesday, July 11, 2012

Preparing for Airventure 2012

As I anticipated, I have NOT been able to devote much time to the build over past couple of weeks because I needed to focus on preparing for the long 2000 mile road trip (1000 miles each way) to Airventure in Oshkosh Wisconsin. This will be year number 4 for me, and more importantly it is the fourth year in a row that I will make the pilgrimage and attend the entire event.  So many others are unable to attend the whole thing, and I feel truly blessed to be able to experience it each and every day of the week-long event. Even more important is that my son will be attending the event with me again this year.

I have had to spend some quality time taking care of my home away from home, and I am happy to say that the preparations are almost complete. I usually end up having to amke at least some kind of water system repair from the previous year to my trailer. Maybe one day I will learn how to properly winterize everything, but until then, water system repairs are just part of the norm for me. It was actually not too bad this time - my 23 year old bathroom faucet valves finally decided to stop working, I found another one at HD for 11 bucks to replace it. Then I had a plastic P-trap drain part that was leaking along the seam. My dad offered up a fantastic remedy by using some of that rubber - in - a - spray can stuff to stop the leak, and it seems to have actually worked. I may have to remember that if I ever develop a leak in the airplane someday.

So far the extended weather forecasts for the Wisconsin area look very promising, adn are reminiscent of every other year I have attended excet for 2010, with temps in the comfortable 70s and 80s. VAF has already organized a gathering after the opening day Steve Miller Band concert, and I can't wait to attend that. My week is already chalked full of activities, including banquets, forums, workshops, adn just walking around gawking at airplanes for hours. Truly heaven on earth as far as I am concerned. 

As for the build, I will probably be able to finish straightening and deburring the ribs, and might even be able to start match drilling some of them to the spar, but that will be about it before it is time to depart for Oshkosh. For those of you Attending, I will see you there. For those of you following my blog that have never been - you really have to do this at least once in your lifetime. It is probably the most positive experience I have ever had in my life, and I am almost to a point where I cannot imagine my life without it and the wonderful support from the EAA.

Sunday, July 1, 2012

Attended My First Engine Hanging Party

Last night I attended my very first aircraft engine hanging "party" at Ron Duren's house. It is traditionally called a party, but the reality is that the "party" did not begin until after all the actual work to hang the brand new Aerosport Power IO-375 engine was completed. It took about an hour and 45 minutes to complete - a little longer than expected, but we still got it done. Ron, thanks for inviting me to participate, and congrats on your newly mounted engine.

I had intended on taking a lot of video to document the process involved in performing this task, as I truly expect to be doing the same thing in a couple of years. Instead, I found myself highly involved in the process from the very beginning, and I ended up being very much "hands on" throughout most of the event, so unfortunately no video was captured. What I did come away with was a ton of pictures after the deed was done.

This engine is a 4 cylinder, fuel injected engine that generates close to 190 horsepower. It was extremely beneficial for me to be able to get a close up view of the components that make up this engine. I was able to see where the magnetos, fuel pump, prop governer, oil filter, Fuel distribution spider, and fuel control module are installed, as well as the oil fill/dipstick, alternator, starter, spark plugs, exhaust, and intake ports were installed as well. It was one of the few times I ahve been able to see a reciprocating aircraft engine completely out in the open, with no cowls or wires or tubes in the way.

The process actually took about an hour and a half, with jokes and speculation coming from the gallery of others in attendance that we should be able to hang this 300 pound beast in about 10 minutes to a half hour. My personal understanding of this from what I had read previously was that about an hour is usually what it takes to get everything installed on the engine mount.

Here is a shot of the installed engine. Ron had it painted red, and also had his engine mount powder coated the same color. SO what color do you think is primary for Ron's airplane? If you guessed RED, you are correct.


I guess I found it rather ironic that we were doing this in 100 degree heat, with wild fires burning all around us for weeks, with heavy smoke in the air, and here we are, hanging a fire-engine-red airplane engine on an airplane. I'm not really a red kind of person, but I will admit that this engine did look very beautiful with everything all painted and looking shiny and new. I am told that this engine will set you back about $31,000.00, with that and the prop being the two most expensive parts of this process, with avionics following close behind.

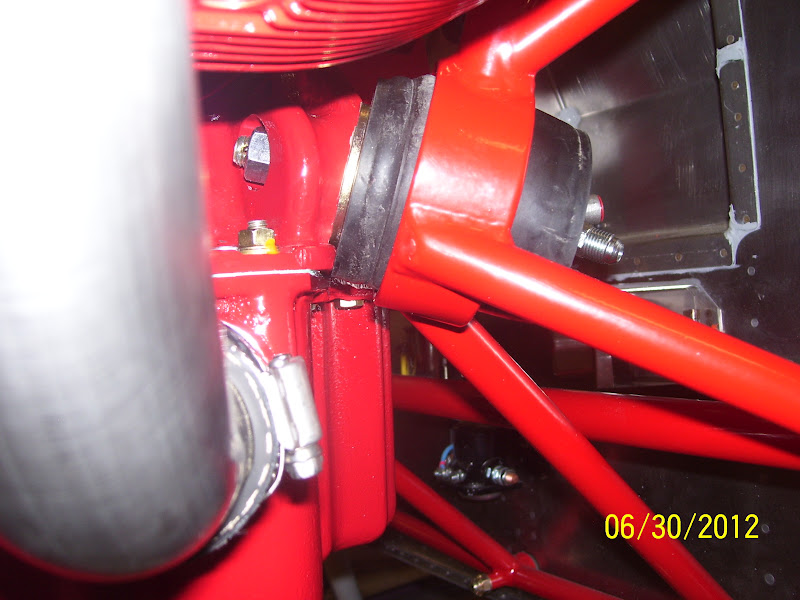
The engine mount is a special type of engine mount that is known as a dynafocal - 2 engine mount.There are 4 mount points on each of the 4 corners of the engine block, all of which are at specifc angles to the engine block. The actual engine mounts are also a special type of mount, called a Lord mount or something like that. The mounts are basically large round rubber disks that are inserted into receptacles in the engine mount, not unlike some engine mounts that are used for larger Radio Control Model engines. There are 3 main pieces to each engine mount, an outer and inner disk, and then in the middle on one side is an ellongated, egg or football shapped rubber insert. The mounting bolt inserts through the aft side of the engine mount, through the holes in the inner disk, then in the insert, and finally through the outer disk and through the mounting hole on the engine. There is also a specific order of the position of reach disk which is basically reversed between the top and bottom engine mounts.

Then apparently there is also a recommended order for inserting the bolts through the engine mounts. You start with the top right, then the top left, and the bottom right, and finally the bottom left mount. There is also a set of washers that must be inserted in the proper locations.

The process began by removing the mounting bolts for two large metal support brackets that the engine was mounted on for shipping. The engine had been on the hoist ever since Ron brought it home. After the shipping mounts were removed, the engine was raised on the hoist. The first area of concern was getting the magnetos and the fuel pump safely inside the engine mount. This whole process works well with about 3 people. One on each side of the engine and one on the hoist. We were able to maneuver the back of the engine so that the fuel pump and magnetos cleared the mounting bracket, and then we started aligning the bolt holes on the engine with the holes on the mounts.

Here is shot of the hoist that was used to lift the engine in place:


This next pic clearly shows the bottom left engine mount assembly. The top bolts managed to get inserted into the mounting holes with a little coaxing and pounding with a rubber mallet, and the bottom right bolt was also eventually inserted in the hole. The problem - and the source of about 45 minutes worth of difficulties, came when we tried to insert the bottom left bolt into the mount. The holes were anywhere from a full bolt width to a half bolt width off, and no matter what we tried we could not get this hole to line up.


The key to the solution came when I realized that the bottom of the outer rubber engine mount disk on that side was hitting the bottom of the oil sump casing. This was why the hole would not line up. Then somebody else finally realized that the reason that was happening was because the large washers were not in the proper position on the bottom mounting brackets.The thick large washers actually go between the engine and the outer engine mount disk on the bottom engine mounts, but go on the inner engine mount disks and the bolt head on the upper engine mounts. Click on the pics to get a larger, more detailed view. you can see the washer in the above pic, as well as the edge of the oil sump in relation to the rubber disk. The washer allowed the disk to just clear the casing of the oil sump, and this then allowed the engine mounting holes to line up correctly after loosening the nuts from the other bolts and raising the engine a bit more. The key was that we were able to raise the engine a bit more because the bottom left engine mount disk was allowed to clear the oil sump flange after the washer was properly placed into position.

Here is closeup of the top left engine mount:


Note the castlated nut. Each of the mounting bolts is allowed to turm in the mount due to vibration and shock absorbing affects of the engine mount. SO each bolt has a hole drilled through the tip at a specific location on the bolt, and the nut is screwed down and a cotter pin inserted throught bolt hole, trapping the nut so it cannot turn inward or outward. ANother interesting thing I learned about the engine mounts is that there is no torqueing involved. These engine mounts basically have an inner insert with the metal shaft, and my understanding is that you simply screw each bolt down on the nut until you feel it "bottom out" on the shaft of the inner insert. At that point the engine mounts are properly compressed, and the bolt is screwed down to the proper position.

Here is shot that includes the top side of the top left engine mount and the oil filter, which by the way was also removed before we began the process of pushing the engine closer to the engine mounts when we began the process.


Next is a pic from the right side that shows P mags which are think are electronic ignition magnetos that are utilized to provide the spark to two sets of spark plugs.Also shown is a shot of the upper right engine mount and the oil filter


Next is a shot of the engine-driven fuel pump and the firewall:


And finally a view from the front:


I took several other shots of various components, but sadly many of them turned out blurry. I get so damned pissed off at digital cameras every so often. Sometimes technology is not the best thing on the planet. Anyway, I am NOT going to post those at this time. Just wanted to give an idea of the engine mounting process and capture some of the issues and difficulties and tips and tricks to making this a success. It also felt kind of good to be able to be the one that initially identified the problem area for the final engine mounting bolt that allowed to figure out the problem, get it resolved, and finish mounting a very nice looking aircraft engine. Way to go Ron!