Over this weekend I finally got to do some more work on the wing stands. They are still not to the point where I am ready to clamp the wing spars on them, but as with so mnay other things about this project - you just have to keep doing all the little things that need to be done, and one day you will have a completed airplane. Just ask Ron Duren, who just announced after a long, extremely focused work ethic on his RV-7 project, recently announced that he is ready for the big move from the garage to the hangar at the airport. Usually once that is done it is not too much longer afterward that ingeine first starts and first flights are performed.
First pic is of the bottom of the wing stands. Note how the welds have been ground down so they are flush with the bottom of the flanges. Since one of the two welds performed on each angle bracket was on the bottom, these welds have to be ground down so that the stand will sit level on the concrete floor of the garage.
Aaron had already done a great job grinding down 3 of the four stands while they were still at his house before I loaded them up in the car for the ride home several weeks ago. The last one still needed to be done as shown in the pic below:
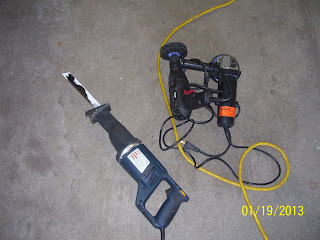
In addition to grinding down the bottom welds, Aaron had told me to cut wedges in the flanges of the angles to avoid catching your foot on them. Since his Dad's plasma cutter was not cooperating with the generator on the day they were welded to the posts, we resolved to use a reciprocating saw with a metal cutting blade to do the job. This, in addition to the grinder and an abrasive 3M wheel to clean the weld joint and remove corrosion, were the tools utilized this weekend as shown below:
The abrasive wheel is chucked in the drill. The metal blade in the recip saw really worked well to trim the flanges. It was a little bit of a trick to figure out how to hold the saw blade to trim only one flange at a time. Even more amazing was how this saw blade basically cuts through 1/4 inch thick steel with relative ease. I have used the recip saw for a variety of projects over the years, and I sort of have a love/hate relationship with the thing. In some instances it has almost broken my arm, and in other instances it works just fine with no problems whatsoever. Luckily the latter was the result on this particular project.
Here is a shot of the finished cuts from the saw. Basically I am just cutting a 45 degree angle or so on each vertical flange of each angle. Not shown yet is that I then took the grinder and removed all the sharp cut edges on each cut. The hope is that I will not catch my foot or cut myself on these while I work around the wing.
I then marked the positions for the mounting holes on the bottom of each flange, and per information from Aaron as to how he did this, I purchased a set of titanium bits with a pilot tip (DEwalt) that are 2 inches in from the edges of each angle, centered at 7/8 inches from the edge. Keep in mind that the angles are 2x2 inches wide, and 18 inches long. So you might think that the holes need to be centered at 1 inch centers. However, you alos ahve to keep in mind that they are 1/4 inch thick, and that 2x2 inch measurement is from the outside edge of each angle, so it does not account for the 1/4 inch thickness of each flange. So you need to measure the center point for the mounting bolt hole based on the inside distance of the angle, or 1 and 3/4 inches. This puts the centers at 7/8 inches from the outer edge. I then drilled a pilot hole with the 1/4 inch drill bit and was amazed again at how well the bit drilled through the still flange. I used some boe lube wax to help lubricate the bit. I then followed up with a 1/2 inch bit. Even though the anchor bolts I am using are only 3/8 inch bolts, Aaron suggested that I drill 1/2 inch wide bolt holes in the angles to allow some wiggle room in case the anchors are misaligned slightly from perfect 14 inch centers, which is highly likely.
I got the mounting holes drilled in 2 of the four wing stands, so I have eight more holes to drill in the two remaining stands (4 per stand), and then comes the priming and painting. Guess I also forgot to mention that I cleaned them up with acetone to remove this really dirty coating on the posts that must be from some sort of packing oil or something. That seemed to do a pretty good job of removing the residue. Looks like we get some good warm weather here for a change this week so I expect to complete the priming and painting, and perhaps even get them mounted to the floor by next weekend.
So no glaring posts about completing major airplane parts this week, but I am getting the small steps done to blast these wings out as quickly as possible. One step at a time.......
Subscribe to:
Post Comments (Atom)


No comments:
Post a Comment