Looks like it has been a week since my last post. This is not because I have not been working on the plane. This past week has been heavy with research, calling Vans to get answers to various questions, searching VAF to see how others have done things concerning the fuel tanks, and then the holidays managed to rear their ugly head once head, severely impeding what would otherwise be pretty good progress on the fuel tanks.
I ended up getting involved in one particular project that I managed to finish up today, that at face value does not seem to have anything to do with airplane building. More about that later.First I need to pick up where I left off, which was with the fabrication and match drilling of the stiffeners for both fuel tanks.
After that I took a deep dive into the plans and diagrams again, and started hitting up VAF pretty hard in search of answers to some very specific questions. It started when I was looking at the steps to fabricate and drills the rivet holes and holes for the fuel fittings and the vent line. I'll start with the vent line:
Q: The plans for the capacitive senders said to run the wires attached to each sender plate through the SB437-4 bushings that simply insert into the holes at the top of each rib that support the 1/4 inch OD hollow aluminum tubing from one end the tank to the other. The plans say to drill a small hole in the inner portion of the outer flange of this bushing to route the 18 ga. wire along side the vent line tubing. When you look at the snap bushing you just laugh, because Vans instructions are ridiculous. The question to them was how to drill this magical hole without exposing the wiring to the sharp edges of the hole in the tank rib where the snap bushing snaps into it. (There ain't a lot of room between the vent line and the snap bushing.
A: I was told by Vans to take a solid piece of 1/4 inch rod an insert it into each of the several snap bushings and then drill a hole on the inner surface of the bushing right next to the rod.
NOTE: I have since found out from my buddy Mike Rettig that the REAL way that most builders have done this is to take a jewelers circular file and file a small depression in the inner wall of the bushing - just enough to allow the wire to be inserted right next to the vent line. This needs to be done for each bushing through about 5 of the tank ribs.
Now, after having spent all this time writing up that little gem. you'll LOVE this:
As soon as I asked the above question to Vans, there was a pause on the other end of the phone for several seconds, and the next thing I heard was this:
"You must have ordered your wing kit with the capacitive sender kit a long time ago." Yes, I said, about 2010 as I recall. "Can I give you some advice?" Sure. "Take that capacitve sender kit that we sent you and throw it all away." Your kidding-right? " Nope. They have had so many problems that we stopped providing it as an option about 4-5 years ago (2012).
So there I was - all but ready to start working on the sender kit, and now I was being told not to use it. The reasons why were numerous. The most important reason was that different fuels with different blends have different capacitance values. If you ever plan to run auto gas and/or 100LL or some other type of approved avgas, the the capacitance is different for each type. Since most avionics and fuel gauges out there require calibration of the fuel system, the capacities and fuel gauges will all be calibrated with whatever fuel you put into the tanks at the time all this is done. If you then go and change fuels, your calibrations will be off, because the senders will be dealing with a different capacitance value due to the the different fuel. SO basically this will render your fuel gauges completely useless, unless you plan on recalibrating them every time you switch fuels.
I would also suspect that deposits from different fuel blends and additives might even contaminate the plates over time. Next, I was told a story about one of the Vans employees that still flies to work every morning in his RV, which also has the capacitive senders. Each day he flies past a group of three very tall radio towers, and every time he does this his fuel gauges drop to NOTHING due to some sort of RF interference playing havoc with the capacitve senders and electronics involved with the fuel gauges in his avionics system.
SO you might say - well I don't ever plan on switching fuels, so that shouldn't bother me. Well, how do you know what kind of fuel you are getting from place to place as you travel the country side in your new plane? Answer - you NEVER know exactly what kind of fuel you're getting, unless YOU were the one that refined it, tranported it to the airport, put it in the fueling truck, and fueled the airplane your self. Just because a fuel truck says it has 100LL in its tank does not mean that 100LL is what you are getting.
Anyway, the problems begin as soon as you end up with a mix of different fuels in your tanks. Between that issue and the stories of RF interference wreaking havoc on the system, I have decided that I am NOT going to install these stupid things. I'll give you one last consideration about all this, which VFR pilots will just never understand. If you are going to fly in IFR conditions, there will come a time when the weather throws you a curve ball, and you are going to have to make some decisions WHILE YOU ARE IN THE AIR about selecting and navigating to a NEW alternate airport. NOT the one that you filed you flight plan with because at the time when you were planning your flight your original selected alternate airport was within alternate minimums, but the NEW one you are going to have to determine if you ave enough fuel to get to safely, when all the "expected" weather conditions got crap on you while you are airborne.
If you cannot rely on what your fuel system is tellling you, then you have no business flying in IFR conditions in the first place IMHO.SO----now I ahve to purchase VANs fuel senders, which are standard float-type senders with essentially a potentiometer integrated into them. Another slight "hitch" to all this is that since I plan on putting a flop tube in my left tank for some added insurance during aerobatic maneuvering, the flop tube is long enough that it can interfere with the float sender arm, so instead of mounting the float sender in the normal location in the most inboard bay of the fuel tank, you have to mount it in the next bay over from the rear of the baffle plate. Vans plans show where this mod should be done, and the only thing I ponder is access to that unit for repair, removal, or replacement should the need arise - and it WILL arise at some point.
The only way to service the sender from this location, without having to remove the fuel tank from the wing, is from one of the access plate openings under the wing. I need t make sure that I can get to the screws and do whatever is necessary to remove any sealant material for that sender in order to get it out of the tank.
This will take me to the discussion/research about sealants, and some different things that various builders have done to facilitate "ease of maintenance" when the time comes. But it's late, and this post is already long enough with a week's worth of other stuff to report on, so I will end here for tonight. More to come this week. Like I said, lots of research and decisions to make at this stage of the build. Lot's of other experience to evaluate from others that have come before.
Other topics I will cover later:
Fabrication of the T405 and T410 tan k attach and support brackets
Sequence of installing AN833 6D and 4D AN elbow fittings
All about different types of sealant, applications methods, types of sealant to use inside and outside the tank, and more..
Semco Sealant gun and cartridges
Cutting large tank access holes in tank ribs using a fly wheel cutter in a drill press (That was scary and interesting all at the same time).
Using torque or allan head screws for the tank access plate instead of standard Phillips head #8 screws, as well as a different type of sealant for this area than standard proseal
What to do about planning for and putting in a fuel return (purge) line now - if anything?
Bung kit install procedures from SafeAir for extended fuel tank "readiness."
Searching for a piece of hinge material for the infamous "trap door," and what that is all about, and having to get up on my garage shelf for the first time in years to locate the flap hinges to borrow the hinge material I need for this.
Figuring the pivot point/radius from my tubing bending tool, which I will have to use once I start working on the vent lines.
Decisions to make about my standard Vans Fuel caps, i.e. to keep and use those or get some different ones
Bending and fabricating the standard fuel pickup tube from the 3/8 inch tubing supplied by Vans.
Relearning how to flare the ends of the tubing with the flaring tool.
And I'm just gettin' started.......... I'll get around to explaining what I mean by the title for this post in the next post, just to keep y'all guessing!
Till next time,
KPR.
Showing posts with label Fellow Builders. Show all posts
Showing posts with label Fellow Builders. Show all posts
Monday, December 11, 2017
Wednesday, May 31, 2017
Deburring holes and edges, scuffing ribs and LE skin for primer
First things first - a shout out to fellow RV-8 builder and friend Steve Riffe, now living/flying in the Dallas area. We started our tail kits at about the same time in 2009, and he just received his airworthiness certificate for his finished airplane. N ow he can take his first flight and continue with phase 1 flight testing. See post on VAF here , and his builders log is at this location
Its really great to see another soon-to-be-flying RV-8 make it to the finish line. Way to go Steve!!!!
Over the past several days I have been taking care of several small jobs. The first involved more trimming of the Left wing LE skin edges for the new access panel. I discovered that one of the edges was decidedly not aligned with the corners and was not straight. So I took a straight edge ruler and marked "straight" with the sharpee, and then carefully took the file and trimmed down the metal, being careful not to dig any more ridges into the skin. This next pic shows the result:
 If you click on the above pic and view it in a larger resolution and look at the left and right edges you can see the problem. What happened is I filed away a little too much metal on the skin edges. leaving a small gap between the access panel cover and the edge of the LE skin.This happened because I forgot to stop filing after reaching the INSIDE edge of my sharpee line. Instead I kept on filing until the sharpee line was almost gone. Even the ultra fine sharpee can leave at least a 1/32 or 3/64 inch wide line, so you have to remember where to stop removing the metal.
Here is a close up that shows the gap better:

The funny thing is that this gap is much smaller than the Vans access panel and cutout for the original access panel LE skin. I think I have seen posts from other builders where they actually fabricate a new panel cover so that it fits better. Perhaps I will do the same, but for now I will leave it. I still have a lot of surgery to do to figure out how to close up the original hole, and right now that is just a bit more important.
Next is a pic showing the vinyl that I removed from the tip of the LE and the outer races for the rivet holes for each LE rib.
 As I mentioned before, I am pretty certain that leaving the interior and exterior vinyl on the pre-bent edges of any skins applies a bit of extra force away from the wing ribs, making them just a little bit harder to bend into position when assembling the ribs. If you remove the vinyl from this area it reduces that stress a bit. Works for me. YMMV.
With the LE ribs completely disassembled I starting scuffing them in preparation for primer. I still need to clean them, but at least the hard part is done:
 A couple of important notes about this for other builders. even though I took the time 2 years ago to use a small jewelers flat file to remove the bumps that result from the factory bending of the tip sections of each rib, I found that all of the ribs still needed to be filed a bit more. You can see the file I used in the middle of the above pic.
I made sure I rechecked all of these on each rib, because I was surfing the web one day and found a PDF file link to what I presume to the the new Section 5 of the Vans manual for the RV-14, which is much more informative and contains a lot more tips and tricks than my older Section 5 contains. One of the sections specifically called attention to making sure you do whatever is necessary to remove ALL bumps on the front of all leading edge and fuel tank ribs to prevent bumps from appearing in the skin when you start riveting everything together. they even had pictures and diagrams of how this should look.
My litmus test for this is a little bit visual, but mostly by feel. I ran my fingers over the tops and bent sides of each cutout on each rib, and if my finger gets stopped by a ridge, I went to town on it with the file until is felt reasonably smooth. I was surprised by how much more I had to dress these edges out until I was satisfied that they were smooth enough. It will shock you just ho much you need to thin down the edges of some of these sections. don't be bashful about this trimming if you don't want bumps in your LE wing skins after riveting.
I should have mentioned that prior to scuffing everything I deburred all the rivet holes in each LE rib. I honestly do NOT think I had ever deburred any of these holes in the remaining ribs, while i definitely deburred everything involved in the area of the mod that I am doing, I don't think the LE holes had ever been disassembled beyond that. I was amazed at how much some of the holes needed to be deburred.
One of the hardest things I had to do was deburring the inside of all the rivet holes that attach the top and bottom of the LE skin to the wing spar. The outer holes were easy because they are right in front of you, but I must admit I was not prepared for the need to do all of the inner holes. These were a pain for several reasons:
- They are hidden under the wing spar flanges so you have to bend and contort your body in weird ways to get to them all.
- With one side of the main wing skins clecoed in place, I was not able to get my electric drill with my deburring bit into position to debur one side of the holes. The other side was easy because the wing skin was removed. While I suppose I could have removed the mounted wing skins, I did not want to do this because they do help maintain the structure and placement of the frame. So I took the deburring bit out of my drill as I have done before, and twirled it between my fingers, while contorting myself even more while trying to blindly fit the tip of the bit into each inside hole. Easier to demonstrate than explain, but lets just say it was a major pain in the butt, and it leaves my fingers in a rather raw state after doing this for about 100 holes or so. Anyway, the wing spar holes are now deburred as well, so mission accomplished.
Here is a pic that kind of shows the area that needed to be deburred. I only focused on the top row of rivet holes for now, since those are the holes for the LE skin. I will have to do the bottom row of holes when am ready to finish prepping the main wing skins, but that can wait.
 And then finally, after a bit more precise vinyl removal on the inside of the LE skin, I started scuffing the inside of the LE skin. What follows is a series of pics that shows the overall scuff job of one side, and what appear to be rather deep scratches from all the mod work and fitting, installing and removing parts multiple times, and how those scratches seemed to scuff out pretty well with the scotch brite pad, indicating that the scratches were probably only as deep as the alclad coating of the metal.


 And finally, since I will be priming another small batch of parts in the near future, I needed to get two more turkey basters to measure out both parts of the primer, just as I did a few weeks ago. Here is the uncontaminated "new" turkey baster that I got from King Soopers.
 Next steps are to finish scuffing the other side of the LE skin, then wash and clean the ribs and skin, then prime them. Once that is done I will reassemble the LE and attach it on the wing spar so I can mark up the subskin for the new access panel opening and start trimming that lovely piece of metal to its final form, whatever that may be!
KPR!
Its really great to see another soon-to-be-flying RV-8 make it to the finish line. Way to go Steve!!!!
Over the past several days I have been taking care of several small jobs. The first involved more trimming of the Left wing LE skin edges for the new access panel. I discovered that one of the edges was decidedly not aligned with the corners and was not straight. So I took a straight edge ruler and marked "straight" with the sharpee, and then carefully took the file and trimmed down the metal, being careful not to dig any more ridges into the skin. This next pic shows the result:

Here is a close up that shows the gap better:

The funny thing is that this gap is much smaller than the Vans access panel and cutout for the original access panel LE skin. I think I have seen posts from other builders where they actually fabricate a new panel cover so that it fits better. Perhaps I will do the same, but for now I will leave it. I still have a lot of surgery to do to figure out how to close up the original hole, and right now that is just a bit more important.
Next is a pic showing the vinyl that I removed from the tip of the LE and the outer races for the rivet holes for each LE rib.

With the LE ribs completely disassembled I starting scuffing them in preparation for primer. I still need to clean them, but at least the hard part is done:

I made sure I rechecked all of these on each rib, because I was surfing the web one day and found a PDF file link to what I presume to the the new Section 5 of the Vans manual for the RV-14, which is much more informative and contains a lot more tips and tricks than my older Section 5 contains. One of the sections specifically called attention to making sure you do whatever is necessary to remove ALL bumps on the front of all leading edge and fuel tank ribs to prevent bumps from appearing in the skin when you start riveting everything together. they even had pictures and diagrams of how this should look.
My litmus test for this is a little bit visual, but mostly by feel. I ran my fingers over the tops and bent sides of each cutout on each rib, and if my finger gets stopped by a ridge, I went to town on it with the file until is felt reasonably smooth. I was surprised by how much more I had to dress these edges out until I was satisfied that they were smooth enough. It will shock you just ho much you need to thin down the edges of some of these sections. don't be bashful about this trimming if you don't want bumps in your LE wing skins after riveting.
I should have mentioned that prior to scuffing everything I deburred all the rivet holes in each LE rib. I honestly do NOT think I had ever deburred any of these holes in the remaining ribs, while i definitely deburred everything involved in the area of the mod that I am doing, I don't think the LE holes had ever been disassembled beyond that. I was amazed at how much some of the holes needed to be deburred.
One of the hardest things I had to do was deburring the inside of all the rivet holes that attach the top and bottom of the LE skin to the wing spar. The outer holes were easy because they are right in front of you, but I must admit I was not prepared for the need to do all of the inner holes. These were a pain for several reasons:
- They are hidden under the wing spar flanges so you have to bend and contort your body in weird ways to get to them all.
- With one side of the main wing skins clecoed in place, I was not able to get my electric drill with my deburring bit into position to debur one side of the holes. The other side was easy because the wing skin was removed. While I suppose I could have removed the mounted wing skins, I did not want to do this because they do help maintain the structure and placement of the frame. So I took the deburring bit out of my drill as I have done before, and twirled it between my fingers, while contorting myself even more while trying to blindly fit the tip of the bit into each inside hole. Easier to demonstrate than explain, but lets just say it was a major pain in the butt, and it leaves my fingers in a rather raw state after doing this for about 100 holes or so. Anyway, the wing spar holes are now deburred as well, so mission accomplished.
Here is a pic that kind of shows the area that needed to be deburred. I only focused on the top row of rivet holes for now, since those are the holes for the LE skin. I will have to do the bottom row of holes when am ready to finish prepping the main wing skins, but that can wait.


KPR!
Monday, May 1, 2017
2 Halves Make 1 Whole RV10 Fuselage
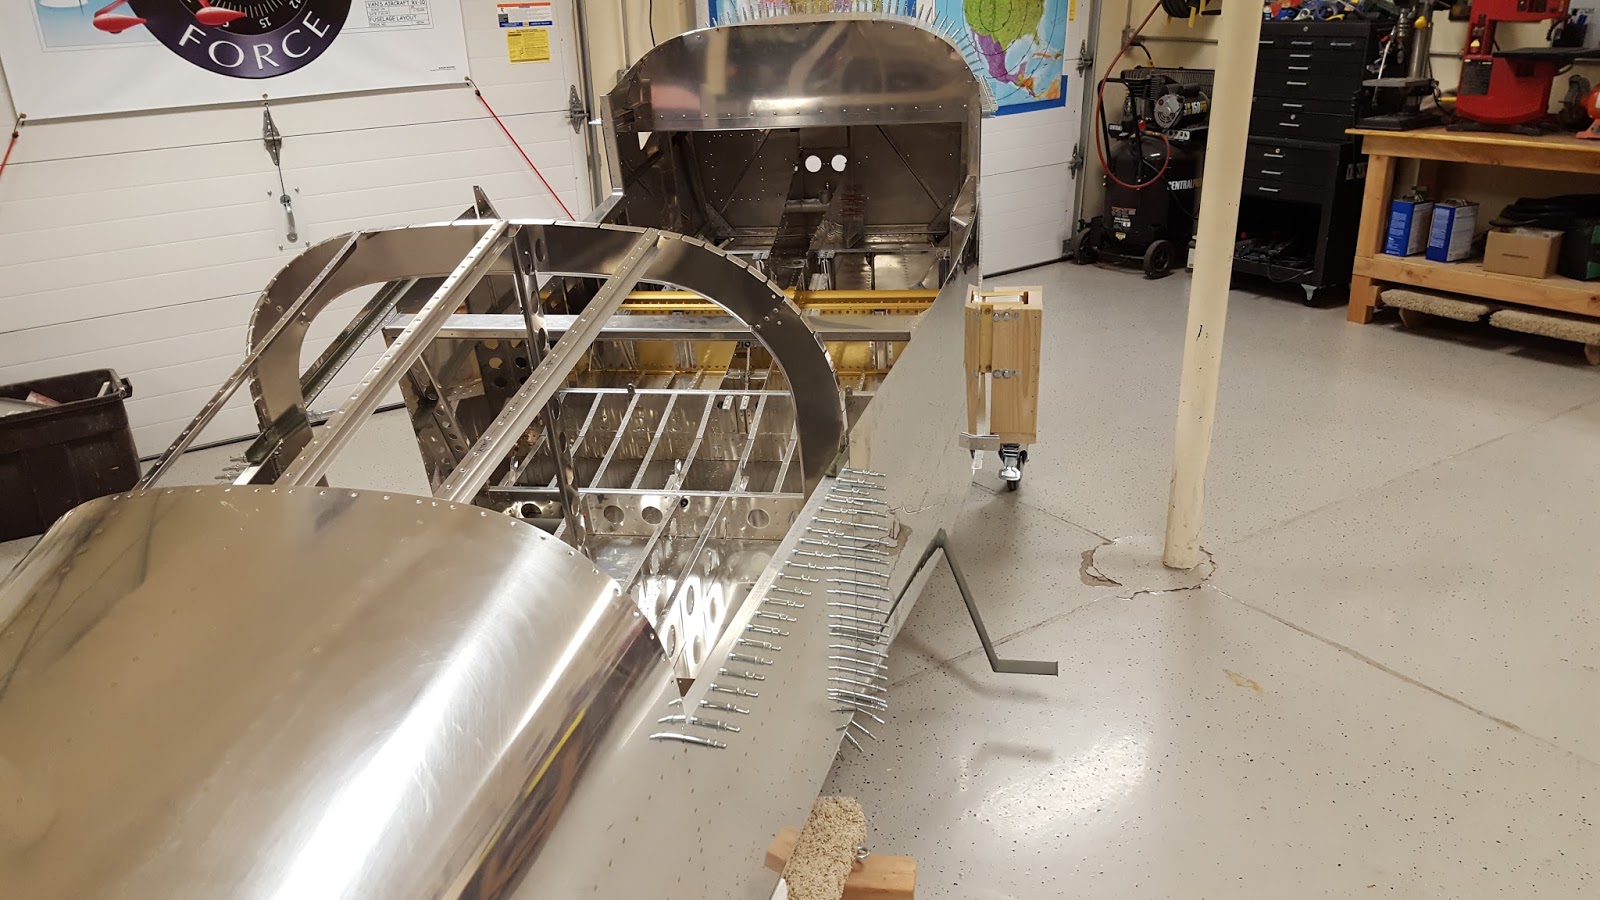
Throughout my experience with building an experimental airplane I have been fortunate to come to know many individuals that share the same passion. Through those relationships I have been able to witness and participate in many unique and exciting things. Yesterday I was able to add one more to that list by helping my buddy Mike join both halves of his RV-10 fuselage together.That airplane is so large (Seats 4 people plus a lot of bags) that the fuselage is initially built in two separate sections. Each of these is then joined together at the appropriate time.
This joining together of major airframe parts is something that has always fascinated me. Being a WW II aviation history buff, I am always intrigued when I see film footage of the factories that were creating fighters and bombers in an assembly line. Large overhead cranes and straps with fuselages and wings suspended from them would somehow be guided into place by a handful of humans, and then they would be magically joined together. I guess this fascinates me even more right now, after having been exposed to airplane building techniques, many of which were developed and perfected way back during WW II.
Three of us - Mike, myself, and Jon Banks were all that were needed to complete this tasks. The process we used at Mike's did not require any cranes or heavy weight-bearing straps, but was still just as challenging and fascinating to see it all happen. Mike's tailcone was strapped down on a 4-wheeled flat dolly shown below:

Before we began the joining process the forward section was up on several saw horses. Mike had Built two very interesting dollies for the forward section. They basically looked like two miniaturized sets of landing gear bolted to the center section wing spar flanges. Jon and I both made fun of these rather interesting sets of wheels, but turns out that they more-than served their intended purpose. The first step was to get the forward section off of the saw horses and onto the ground.


The rear of the forward section was temporarily sitting on the two steps that will be utilized by pilot and passenger to enter the cabin of the airplane. I am dubbing the above pic the "midget 10." With that done, the next step was to maneuver both sections and begin the process of aligning them at the proper angles so they could be joined together and secured.
The trick to this turned out to be setting both sections at the proper angle so that all the mating surfaces of both sections would line up correctly. How was done, you might ask? Measuring sophisticated complex angles, or lifting both sections a prescribed amount? Well, it turns out that several pieces of 2 inch thick foam under the rear section, and some boxes full of books were used on the front section to get both pieces at approximately the right angle so they could be joined together.
This task was not easily done in one shot. It took several attempts at adjusting the foam and the boxes either forward or back from their current positions, and then eyeballing the angles and alignment of the mating surfaces of both parts. Then the metal had to be aligned and positioned correctly while the front section was locked into place and the tail was maneuvered forward and from side to side. It was further complicated by the fact that there were several different types of metal to join, and some of it needed to be sandwiched in between metal from the other part, while flanges from the bulkhead and various pieces of aluminum angle all had to be aligned as well. this took several attempts to get right. When we began, the left side aluminum was lining up, but the right side was not. Then one part would go in correctly and another would pop back out..... After messing with this for about 20 minutes, it all finally came together.
Then the task of inserting clecoes into the joined parts began. Getting ALL the rivet holes to line up enough to insert the clecoes was also a challenge for certain areas. Here is Mike with pliers in hand making it happen:

And here is Mike and Jon after the deed was accomplished. This is yet another major milestone in completing the airplane, so smiles are more than appropriate:

Not so easy to move things around anymore, is it?


Here is a pic that shows the final locations of the rear dolly, which has been moved up about halfway to serve as a support for a box that sits under the major support section of the bottom of the forward section and the location of the box being used to support the tail section. The combination of the rear dolly and the wheels mounted on the forward section gives just enough clearance to keep the foot steps off the ground and keeps both sections pretty well lined up.

And finally - Mike at the pilot's position with a makeshift seat in forward section of the cabin. I'm really jealous of this and I can hardly wait until that is me in my fuselage skeleton making airplane noises - a right of passage for builders that reach this important stage of the build.

Then, after all the hard work was done, Mike treated Jon and I to dinner. Thanks for that Mike! Now I can add this to my list of engine hanging and wing joining exercises I have been fortunate to be a part of. Not shown in these pics is the very large top fiberglass section that also joins the two halves together on the upper portion of the fuselage. I imagine Mike will be starting on that work in the not-too-distant future. Lookin' good Mike!
This joining together of major airframe parts is something that has always fascinated me. Being a WW II aviation history buff, I am always intrigued when I see film footage of the factories that were creating fighters and bombers in an assembly line. Large overhead cranes and straps with fuselages and wings suspended from them would somehow be guided into place by a handful of humans, and then they would be magically joined together. I guess this fascinates me even more right now, after having been exposed to airplane building techniques, many of which were developed and perfected way back during WW II.
Three of us - Mike, myself, and Jon Banks were all that were needed to complete this tasks. The process we used at Mike's did not require any cranes or heavy weight-bearing straps, but was still just as challenging and fascinating to see it all happen. Mike's tailcone was strapped down on a 4-wheeled flat dolly shown below:

Before we began the joining process the forward section was up on several saw horses. Mike had Built two very interesting dollies for the forward section. They basically looked like two miniaturized sets of landing gear bolted to the center section wing spar flanges. Jon and I both made fun of these rather interesting sets of wheels, but turns out that they more-than served their intended purpose. The first step was to get the forward section off of the saw horses and onto the ground.


The rear of the forward section was temporarily sitting on the two steps that will be utilized by pilot and passenger to enter the cabin of the airplane. I am dubbing the above pic the "midget 10." With that done, the next step was to maneuver both sections and begin the process of aligning them at the proper angles so they could be joined together and secured.
The trick to this turned out to be setting both sections at the proper angle so that all the mating surfaces of both sections would line up correctly. How was done, you might ask? Measuring sophisticated complex angles, or lifting both sections a prescribed amount? Well, it turns out that several pieces of 2 inch thick foam under the rear section, and some boxes full of books were used on the front section to get both pieces at approximately the right angle so they could be joined together.
This task was not easily done in one shot. It took several attempts at adjusting the foam and the boxes either forward or back from their current positions, and then eyeballing the angles and alignment of the mating surfaces of both parts. Then the metal had to be aligned and positioned correctly while the front section was locked into place and the tail was maneuvered forward and from side to side. It was further complicated by the fact that there were several different types of metal to join, and some of it needed to be sandwiched in between metal from the other part, while flanges from the bulkhead and various pieces of aluminum angle all had to be aligned as well. this took several attempts to get right. When we began, the left side aluminum was lining up, but the right side was not. Then one part would go in correctly and another would pop back out..... After messing with this for about 20 minutes, it all finally came together.
Then the task of inserting clecoes into the joined parts began. Getting ALL the rivet holes to line up enough to insert the clecoes was also a challenge for certain areas. Here is Mike with pliers in hand making it happen:

And here is Mike and Jon after the deed was accomplished. This is yet another major milestone in completing the airplane, so smiles are more than appropriate:

Not so easy to move things around anymore, is it?

Here is a pic that shows the final locations of the rear dolly, which has been moved up about halfway to serve as a support for a box that sits under the major support section of the bottom of the forward section and the location of the box being used to support the tail section. The combination of the rear dolly and the wheels mounted on the forward section gives just enough clearance to keep the foot steps off the ground and keeps both sections pretty well lined up.

And finally - Mike at the pilot's position with a makeshift seat in forward section of the cabin. I'm really jealous of this and I can hardly wait until that is me in my fuselage skeleton making airplane noises - a right of passage for builders that reach this important stage of the build.

Then, after all the hard work was done, Mike treated Jon and I to dinner. Thanks for that Mike! Now I can add this to my list of engine hanging and wing joining exercises I have been fortunate to be a part of. Not shown in these pics is the very large top fiberglass section that also joins the two halves together on the upper portion of the fuselage. I imagine Mike will be starting on that work in the not-too-distant future. Lookin' good Mike!
Sunday, June 1, 2014
Removing wing skins and stripping vinyl, and pics of recent visit of two almost completed RV projects
I removed the top outboard wing skin of the left wing and began the process of stripping the vinyl. After the drilling is over you kind of start to dread the deburring part a bit because this must be done on both sides of the skin. SO there are a total of 8 separate wing skins for the top and bottom of both wings(4 per wing), but you have to debur holes on both sides, so that is all the holes on each wing skin times 2 for the front and back. Then you have to debur the holes in the rib and spar flanges - again that is also both sides of each of those. If you focus too much on the large number of holes then you can become overwhelmed sometimes, so it is best just to get started and see how long it takes to get through a certain number of them. Then you will know how long it will take to do the rest of them. When the time comes dimple the skins I will take my time to ensure that I do not create any figure 8 holes in the skins.
Anyway, here is one side of one wing skin with the vinyl removed. The new soldering iron worked much better, but it was not perfect:
 Next is another important pic. When you remove the skins, you realize just how much material was removed during the match drilling exercise. The silver speckles are the chips of aluminum. These all need to be removed.
 And then I took this pic of my makeshift movie night movie screen. It was such a nice weekend after having been such horrible weather around here for the past several weeks that I just felt compelled to get out the king size bed sheet and use some of my clamps for something other than mashing metal parts together. I rig a projector on the opposite end of the garage and connect that to my laptop to show some movies every once in a while. Works pretty well. My seating capacity in the garage is a bit reduced with both wings on the stands, but it still holds a few folks.
 Next are some pics I promised a while back. Thanks to John Tedder and Lyn Langer whose RV-7As are well on their way to becoming real flying machines. I am really interested in Lyn's aircraft because he has a 180 HP IO-360 from Superior with their extremely popular Millineum Cylinders. I just noticed on their website that they have come out with a 195 and 200 HP version that I can build myself by attending their 2 week class. I took a ton of pics but will include a few of them here.
Here is Lyn's engine:
 And the rest of the aircraft. I can't wait until mine is looking like this someday:


John had his wings off while he works on his avionics. I checked out his wing wiring, fuel tanks, and landing light installation....

 NOthing beats seeing things assembled up close. If you get these opportunities you need to take tons of pics because they will help later. I captured most of Lyn's fuel system routing from the firewall to the fuel servo to the injector manifold and out to the cylinders. Perhaps I'll post some of those pics later on.
All for now. I hope to have all wing skin and rib holes deburred by the end of this week.
Anyway, here is one side of one wing skin with the vinyl removed. The new soldering iron worked much better, but it was not perfect:
Here is Lyn's engine:
John had his wings off while he works on his avionics. I checked out his wing wiring, fuel tanks, and landing light installation....
All for now. I hope to have all wing skin and rib holes deburred by the end of this week.
Sunday, October 20, 2013
Local Area RV Group Halloween-Themed Movie Night - Scary Fantastic Time!
Kudos to the folks that decided the time was right to put together a movie night at the traditional location at Gary Zillik's Hangar at KFTG. What was somewhat UN-traditional about this one is that it was a total Halloween - themed party AND movie night, complete with scary food and drink, and yes, even a scary movie or two to cap it all off.
It seems to have been a very busy and event-filled year for just about everyone that I know. As a result, this was the first movie night for the entire year that was held at the Zilik Hangar, and about the only one I know of that was put together at all by anyone in the local area. The timing could not have been better, as it seemed that everyone was ready for a good bit of Halloween fun.
Little did I know that the spiders in charge of this event were planning to make it a much more special occasion that I was expecting. The first clue that this was going to be a really fun evening was when we walked in the door of the hangar, and this is what we saw:

Wow! A fully decked out table setting - Halloween style! How cool was that.
Some of the aircraft that call this hangar their "home" had been moved outside to allow the masses of ghouls and goblins to infiltrate the space for a short time. Here is the "theater" seating arrangement:
 And a glimpse of the Movie screen to give a truly wide screen feel:
 Next was the food table. Deb had mentioned that sub sandwich fixings would be provided, and if anyone wanted to bring a dish they certainly could. Then she provided a small list of Halloween-themed dishes, and wow, did the group ever deliver on that!There was not a single inch of space left on the entire work bench!
 When she said "sub sandwich meats," I had no idea they would look like this. Do I REALLY want to make a sandwich out of this????!!!:
 Now for a tour of the other food items.First was a spider web 7 layer dip:
 I think this next one came from the Rettig family - Caprese eyeballs I think they were called. Very tasty by the way:
 Next was a healthy supply of salty bones. To the right of the bones is my contribution - Monster brain stuffed mushrooms. Ed. Note - there was nothing to bring home - everyone loved eating all the monster brains! Not sure what that says about pilot-types!:

Next were some bloodshot eyeball eggs. When I pause to try to figure out how these were made I realize that these must have taken considerable time to prepare.What truly and amazingly talented folks we have in this little RV group of ours!
 What? A pumkin-orange you say? Believe me, they really DO exist!
 Bloody cheese and crackers, anyone?
 Purple people eater cake, anyone? All I can say is - I shouldn't have, but I did. This was at least a 3 or 4 layer cake - filled with all kinds of yummy no-so-good-for-you frosting and fillings. My taste buds could not decide which part of this thing they liked best - they just kept saying "MORE PLEASE!"
 Fruit punch from the caldron,anyone? All I was told is that this was supposed to be an "adult" beverage. Everyone knows there are no "adults" in a room full of pilots, but I decided to have some anyway. Very tasty!
 How about some slime sauce with your apples?
 There were lots of spider webs at this party. I really have to tell the hangar hosts to do a better job of cleaning up before we all show up!
 Creature cup cake anyone?
 All I can say about this next dish is WOW! Are these potatoes? Apples? Something else? Whatever they are, someone in our group is a true Halloween artist. How cool was this?:
 This next dish was so scary-looking that I was afraid to eat one. They were "finger" licking good though....

Whew! Now that I got through all that, how about a few normal human shots-well mostly anyway.....
Adam and his girl friend. This also happened to be Adam's birthday, and so we made certain that he was adequately embarassed when the whole group sang happy birthday to him. Happy birthday son!!
 Next was the star of the show in the lady bug outfit, in the company of parents Mike and Aneta Rettig, taken while on a pretend flight in Gary's RV-6A that is affectionately know as "PAPA ZULU."

 Gary and Carolyn and Scott and Deb, and all the rest of you that I am sure contributed to such a fantastic time, thank you so much for deciding to put this together. After everyone was well fed on all the Halloween feast, the movie Ghost Busters was served. It was fun to see that movie again in its uncut full feature version.
Deb and I were discussing the party after the movie, and we already started talking about next year. She then said that she just wasn't sure how they would top this for next year. I told here not to worry about topping anything. This was such a wonderful time that I simply told her that I am down for a complete repeat of this same thing next year. Many of us needed a break for some fun after a long hard year, and you guys delivered in spades! (Halloween pun intended!)
It seems to have been a very busy and event-filled year for just about everyone that I know. As a result, this was the first movie night for the entire year that was held at the Zilik Hangar, and about the only one I know of that was put together at all by anyone in the local area. The timing could not have been better, as it seemed that everyone was ready for a good bit of Halloween fun.
Little did I know that the spiders in charge of this event were planning to make it a much more special occasion that I was expecting. The first clue that this was going to be a really fun evening was when we walked in the door of the hangar, and this is what we saw:

Wow! A fully decked out table setting - Halloween style! How cool was that.
Some of the aircraft that call this hangar their "home" had been moved outside to allow the masses of ghouls and goblins to infiltrate the space for a short time. Here is the "theater" seating arrangement:


Next were some bloodshot eyeball eggs. When I pause to try to figure out how these were made I realize that these must have taken considerable time to prepare.What truly and amazingly talented folks we have in this little RV group of ours!


Whew! Now that I got through all that, how about a few normal human shots-well mostly anyway.....
Adam and his girl friend. This also happened to be Adam's birthday, and so we made certain that he was adequately embarassed when the whole group sang happy birthday to him. Happy birthday son!!


And finally a pic of what can happen to you if you are not careful when using riveting tools! Sean Blair posing as "The Rivet Man". Way cool Sean! Before the party, how on earth did you????? More importantly, after the party, How on earth did you....? Whether putting them on or taking them off, it all looks painful to me! This is a best costume award as far as I am concerned. Also note the red bags under the eyes. This is a sure sign that you are working way to many hours on an airplane. All airplane builders should take note of these tale-tale signs of "builder fatigue," and also take note that the only way to cure this problem is to ocassionally stop working on the airplane, grab a beer, and just relax!

Deb and I were discussing the party after the movie, and we already started talking about next year. She then said that she just wasn't sure how they would top this for next year. I told here not to worry about topping anything. This was such a wonderful time that I simply told her that I am down for a complete repeat of this same thing next year. Many of us needed a break for some fun after a long hard year, and you guys delivered in spades! (Halloween pun intended!)
Saturday, October 5, 2013
The nightmare is almost over.......
As of this morning all of the major upstairs bathroom remodel work is done. Unfortunately all attempts to stop the leaking of the downstairs shower have failed, and I am all but convinced that the problem is with the drain that this stupid moron we hired to the work way back in March absolutely screwed it up. Now that I have a functional (and quite nice looking) upstairs bathroom again, I will wait until next year to start the process of ripping the shower out and re-doing that myself.
I desparately want to get back to airplane building. This house of mine has sucked enough life out of me this year, and it is time that I get my own life back for a change. My only real saving grace throughout this whole affair has been taking time out to fly young eagles at the monthly EAA Chapter 301 rallies held at KFTG, and working with Mike Rettig to get his Flight review current. Mike's reccurency training was capped off with a great experience last weekend when both of us rented two different C-172s from a local flying club and we both accomplished a couple of "firsts" with our respective flights.
In my case I had been trying to take my niece and her two boys, ages 7 and 3, up in a GA airplane for the first time.We had been trying for over a month but seemed to hit bad weather each time until last week.
In Mike's case it was his first flight with the family,which now includes his wife and their new daughter. Mike is a good pilot, and it was very satisfying for me as a flight instructor to see him get back in the air again after a long respit from flying. Thanks for the opportunity to get you back in the air Mike!
In all cases the weather finally turned out great, and all passengers and pilots made it safely to our destination and back. The destination,by the way, was a short trip to KCOS in Colorado Springs, where we then procured two very nice courtesy cars from the JetCenter FBO, and drove all of an eigth of a mile from the airport to get to a place known as SOLOs, or it is also known as The Airplane Restaurant. This is a fantastic place to go for a $200.00 hamburger. The restaurant actually incorporates almost all of a complete KC-97 air refuleing tanker from the 50s and 60s that served in the USAF during that time. The plane was procured and converted into a restaurant where you can actually sit inside the fueslage of the plane and eat a nicely prepared meal. I made reservations for all of us to sit in the plane, since there are a limited number of seats that are actually in the plane. The rest of the restaurant is in the main building, and there are all sorts of model plane displays and memorabilia to become absorbed in after you finish your meal. The cockpit has been largely preserved in an "as original" state,with the original cockpit radios, levers, and switches all still very much intact.
A great time was had by all, and both flights went very well. I am very proud of my niece and both of my great nephews for being comfortable with using the headsets, and for following my instructions when I needed to talk on the radio. The oldest one even got to fly the plane a little and he was excited about that.
So the act of actually flying every so often has helped me tremendously to get through all the trials and tribulations with the house projects, and now it is time to put aside foolish house things and move back into building mode. I am spending the rest of this weekend getting my shop back in order, and preparing to re-engage with the build, right at the point where I left off, which was getting ready to prep, clean and prime all of my Wing ribs.
Of course, another saving grace for me was to be able to attend Airventure in Oshkosh for my 4th year in a row. There is so much to recount from that trip that I will do so in a separate post. For all you serious builders out there, do not forget to keep your flying skills up during the build.
Sunday, May 12, 2013
Helping MIke Rettig with Fuel Tanks and Back in House Hell Again
Over the course of the past couple of weeks I had decided to cough off some bucks to have a contractor take care of refurbishing two bathrooms in the house - you know, so I could spend more time building the airplane for a change. Unfortunately what I feel has become an all too common theme in America these days is that there is no quality of service anymore. Long story short, and then I will get back to some positive airplane building stuff, I ended up firing the contractor, and I am now fixing everything he screwed up. So now I get to spend time dealing with that instead of working on the plane - a pretty typical sob story for me I'm afraid. Just can't seem to catch a break to have a relatively prolonged spurt of building activety.
I guess this sort of thing kind of bleeds over into some of the same reasons I chose to build my own airplane. The only sure way for me to know the true airworthy state and condition of any airplane that I wish to fly is to be familiar enough with it by building and maintaining it myself. Anything short of that in today's world, and you are possibly putting your life or the lives of others at risk. I just can't help but feel that way after witnessing many counts of shoddy workmanship and less than competent maintenance practices from some maintenance shops over the years.
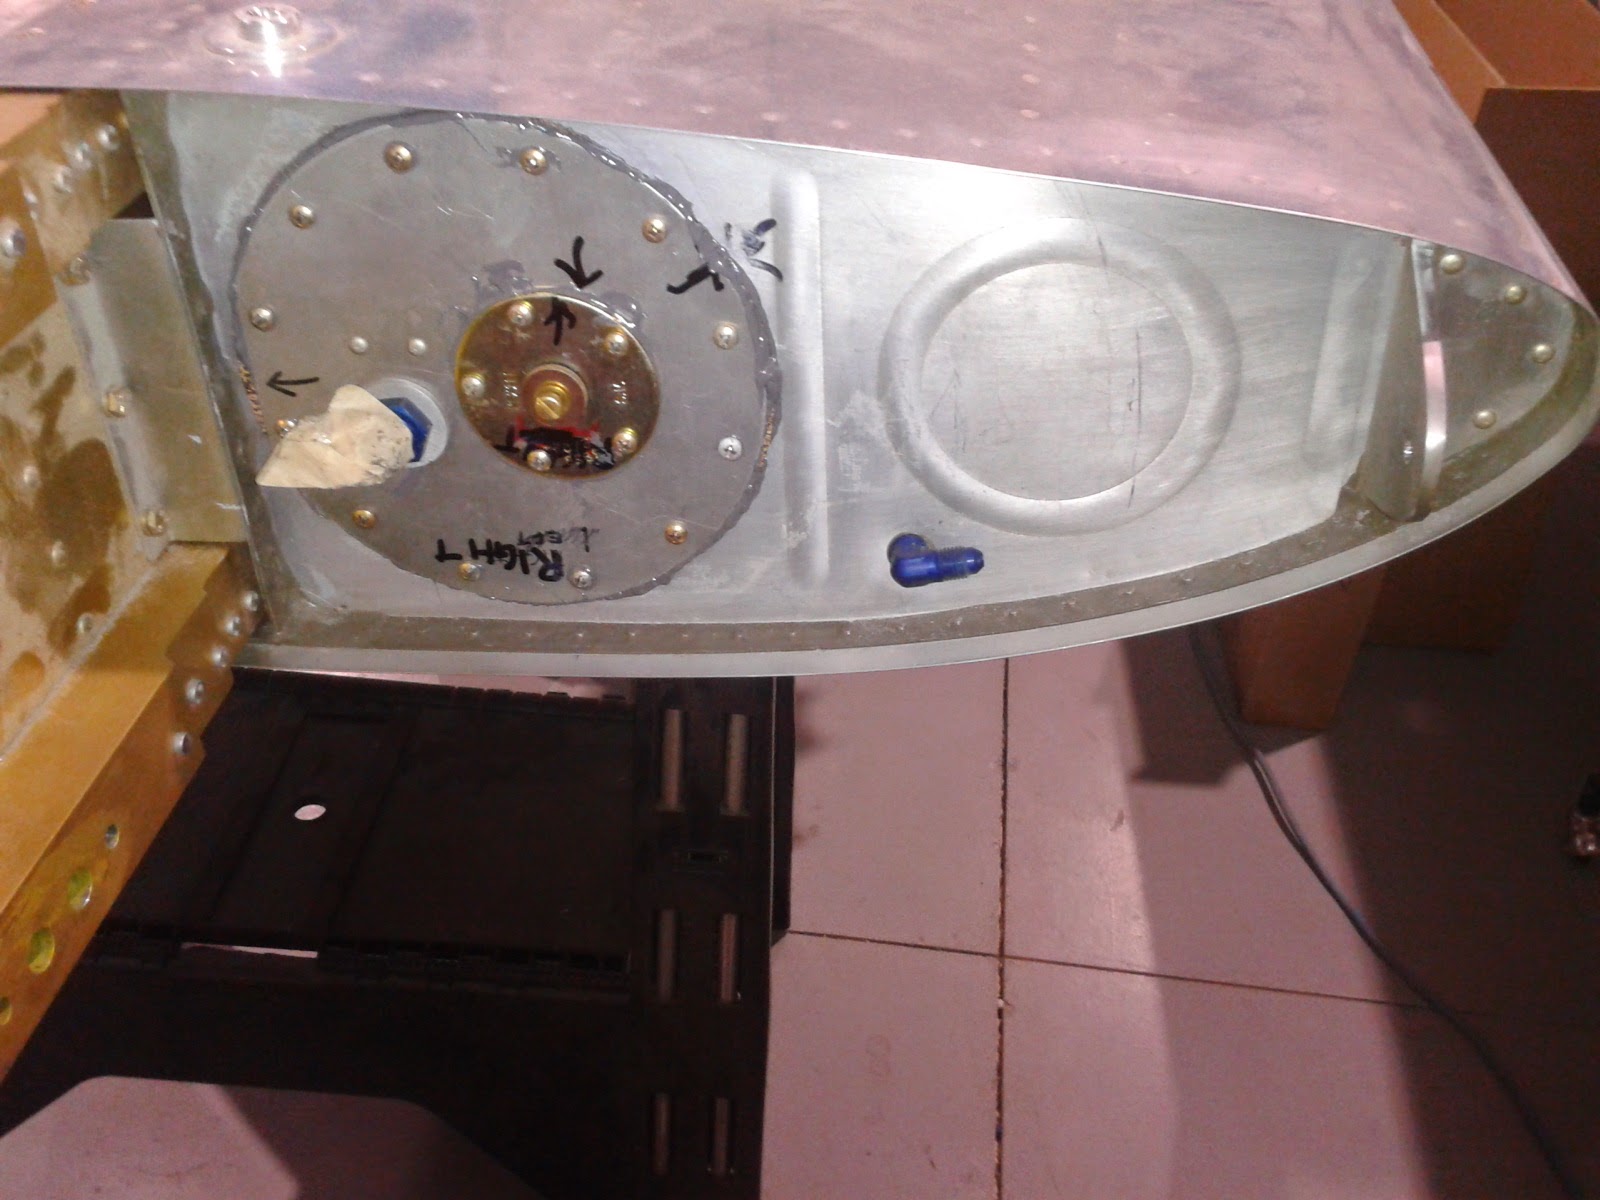
Anyway, on a positive note, I spent a short time on Saturday helping friend and fellow builder Mike Rettig do some riveting on his RV10 auxiliary fuel tanks. This was a great opportunity for me to get my feet wet with the process of working with the Proseal and the rivetting techniques for the fuel tanks. Here is the star of the show just before we commenced:

The process is somewhat the same as any other skin riveting task. The only real difference is that the stem of each rivet is covered in thick black proseal, which is the sealant that is used to keep the fuel from leaking out of the riveted metal fuel tanks. All of the ribs are coated in the thick goo and clecoed to the skin in preparation for riveting. The clecos are removed one at a time, covered in the same goo, and a rivet is placed in each hole. You use the same bucking bar, rivet gun, or squeezer process that is used for other rivets, but for the fuel tanks this is notably messier. It is also a challenge to set each rivet correctly because the rivet stem is covered in proseal, and you cannot see the shop head forming very well, since it will be covered in proseal. So you really must have a good feel for riveting and must be very familiar with how your tools are working before you get to this point in the build process.
The bucking bar gets most of dirty work, since it must be placed on the proseal-covered rivet and will inherently also get proseal on it from any nearby point of the rib or skin during the bucking process. Everything has to get wiped down after each rivet is set to keep from making a complete mess. We used Mike's 3x rivet gun shown here with a mushroom set encased with a rubber boot around the edge. I also have one of these but have not used it yet, so I was curious as to how well it would set the rivets. We discussed air pressure settings and the need to do practice riveting. After Mike had demonstrated the timing to use (about a 1 second trigger pull), I then tried it on the surface of the work bench, everything felt about the same as with my rivet gun, so we decided to proceed without doing any practice rivets before hand.

We did most of the riveting with the tank in the cradle. We started on the bottom side since that is the flatter side of the rib, and it is the easiest to buck. I worked the rivet gun while Mike did the bucking. The truth is that there were not very many rivets to set because Mike had done most of the them the night before. Only the harder to reach rivets around the nose of the tank remained. We used a fairly standard method for riveting with two people that seems to work well for most other builders. It is all done using a 3 count process. The person on the gun calls "One" when the gun is positioned over the rivet and held firmly in place. The bucker calls "Two" when the bucking bar is in position and is ready for driving. The person on the gun then calls "Three" and on completion of that count, presses the trigger on the gun to set the rivet. The bucker then checks the rivet and calls for additional driving of the rivet if needed, or verifies if the rivet is good or needs to be drilled out, which is not something you want to do when doing the fuel tanks.. Then you wash, rinse, and repeat the process for the next rivet, after cleaning up the tools as needed.
Here is a pic of the ribs all prosealed and clecoed in place. Mike had prosealed them all in place the night before, to allow the proseal to stiffen up just a bit for riveting.

Next are some more details about the riveting process. First you remove the cleco, and then the rivet gets inserted into the hole. In most cases, pulling the cleco out of the hole draws sufficient proseal into the hole so you don't necessarily have to pre-coat the rivet first, but sometimes you need to do this if the hole is dry for some reason. Once the rivet is inserted into the hole, a hefty amount of proseal will come out of the hole, covering the dimple and most of the rivet head. The rivet is checked fo proper seating in the dimple and excess proseal is wiped away. Occasionally we had to use the rivet gun to lightly tap a rivet into its final resting place in the dimple, but most of them inserted right into the hole with no problem. You use your finger pressure to ensure that the rivet is as far down in the dimple as possible. Then the gun is placed on the rivet head and the bucking process commences. Afterward, you get a result that looks like this on the manufactured side of the rivet:

For leading edge ribs it is easiest to start on the bottom which is flatter, followed by the top. The most challenging rivets to set are always the two most forward rivets, since they are the ones that are formed around the extreme curved edge of the skin. Even setting the gun in the correct position on these rivets is a bit of challenge, since the goal is to place the mushroom flat rivet set at a 90 degree angle to the manufactured head of the rivet. Trying to figure out what 90 degrees is to a curved surface simply by eyeballing it is a bit tricky, but you can generally figure out the angle by looking at it.
Another key detail item concerns using the cradle when riveting the tanks or leading edges. While the manufactured heads were relatively easy for me to reach with the gun while the tank was in the cradle, bucking them is another story. Mike was standing on a small step ladder to allow him to get up high enough to be able to comfortably reach down inside the tank to buck the rivets. With me pushing on the rivet gun to maintain pressure while setting the rivet, Mike also had to push back on the tank with his free hand to keep the tank from sliding out of the cradle. This was a bit of trick, but he had obviously figured out how to manage it very well. Just another in a long line of acrobatic contorsionistic moves that one must make to complete this job properly.
When it came time to do the most forward rivets, we needed to take the tank out of the cradle and lay it down on a blanket on the work bench. The only other option is to raise it up out of the cradle so the nose is high enough to get the rivet gun in there. But by the time you do that, you lose all of the holding power of the cradle, so it essentially becomes useless and is more inthe way than anything at that point.
The black marks around the rivet heads in the above pic are easily cleaned up with acetone, as long as the proseal is still wet. So this has to be done soon after the rivets are set. The last two pics show the completed fuel tank rivets after cleaning off the excess proseal on the exterior:


Note the little black ring around the rivet heads in the above pic. This pic is a bit deceiving since it shows the reflection of the speckels on the epoxy floor, so just ignore that and focus on the flush rivets. This is a sign of a properly sealed rivet head on a fuel tank. I was pleased with the way this turned out. Mike is not using tank dimple dies on his tanks, and while some rivets do sit proud from time to time, all of these rivets that we set seemed to be nice and flush with the skin, so I am now more confused than ever as to the never-ending-debate about using special tank dies or regular dimple dies for the fuel tank dimples. I purchased a set of tank dies long ago, and I am still mulling over if I am going to use them or not.
On a cleanup and shop prep note - you will need lots of rags, paper towels, and most importantly rubber gloves. You need to stage these items in such a way that you can use or shed them when necessary and dawn new ones to keep everything as clean as possible. Proseal is some very sticky stuff, and it has to be when you consider that it must be resilient enough to withstand aviation grade fuel. Tools and clecoes get cleaned up after all the work is done.
Thanks Mike for the opportunity to help out with this. What a great experience. Lots of builders make this one of the 49% of the entire build that can be literally built by someone else, and still qualify as a homebuilt airplane that was "built" by you, as required for issuance of an Experimental Airworthiness Certificate. I plan on doing my own tanks, and being able to get some hands on with another builder helps emmensely with understanding what it takes to do this successfully.
I guess this sort of thing kind of bleeds over into some of the same reasons I chose to build my own airplane. The only sure way for me to know the true airworthy state and condition of any airplane that I wish to fly is to be familiar enough with it by building and maintaining it myself. Anything short of that in today's world, and you are possibly putting your life or the lives of others at risk. I just can't help but feel that way after witnessing many counts of shoddy workmanship and less than competent maintenance practices from some maintenance shops over the years.
Anyway, on a positive note, I spent a short time on Saturday helping friend and fellow builder Mike Rettig do some riveting on his RV10 auxiliary fuel tanks. This was a great opportunity for me to get my feet wet with the process of working with the Proseal and the rivetting techniques for the fuel tanks. Here is the star of the show just before we commenced:

The process is somewhat the same as any other skin riveting task. The only real difference is that the stem of each rivet is covered in thick black proseal, which is the sealant that is used to keep the fuel from leaking out of the riveted metal fuel tanks. All of the ribs are coated in the thick goo and clecoed to the skin in preparation for riveting. The clecos are removed one at a time, covered in the same goo, and a rivet is placed in each hole. You use the same bucking bar, rivet gun, or squeezer process that is used for other rivets, but for the fuel tanks this is notably messier. It is also a challenge to set each rivet correctly because the rivet stem is covered in proseal, and you cannot see the shop head forming very well, since it will be covered in proseal. So you really must have a good feel for riveting and must be very familiar with how your tools are working before you get to this point in the build process.
The bucking bar gets most of dirty work, since it must be placed on the proseal-covered rivet and will inherently also get proseal on it from any nearby point of the rib or skin during the bucking process. Everything has to get wiped down after each rivet is set to keep from making a complete mess. We used Mike's 3x rivet gun shown here with a mushroom set encased with a rubber boot around the edge. I also have one of these but have not used it yet, so I was curious as to how well it would set the rivets. We discussed air pressure settings and the need to do practice riveting. After Mike had demonstrated the timing to use (about a 1 second trigger pull), I then tried it on the surface of the work bench, everything felt about the same as with my rivet gun, so we decided to proceed without doing any practice rivets before hand.

We did most of the riveting with the tank in the cradle. We started on the bottom side since that is the flatter side of the rib, and it is the easiest to buck. I worked the rivet gun while Mike did the bucking. The truth is that there were not very many rivets to set because Mike had done most of the them the night before. Only the harder to reach rivets around the nose of the tank remained. We used a fairly standard method for riveting with two people that seems to work well for most other builders. It is all done using a 3 count process. The person on the gun calls "One" when the gun is positioned over the rivet and held firmly in place. The bucker calls "Two" when the bucking bar is in position and is ready for driving. The person on the gun then calls "Three" and on completion of that count, presses the trigger on the gun to set the rivet. The bucker then checks the rivet and calls for additional driving of the rivet if needed, or verifies if the rivet is good or needs to be drilled out, which is not something you want to do when doing the fuel tanks.. Then you wash, rinse, and repeat the process for the next rivet, after cleaning up the tools as needed.
Here is a pic of the ribs all prosealed and clecoed in place. Mike had prosealed them all in place the night before, to allow the proseal to stiffen up just a bit for riveting.

Next are some more details about the riveting process. First you remove the cleco, and then the rivet gets inserted into the hole. In most cases, pulling the cleco out of the hole draws sufficient proseal into the hole so you don't necessarily have to pre-coat the rivet first, but sometimes you need to do this if the hole is dry for some reason. Once the rivet is inserted into the hole, a hefty amount of proseal will come out of the hole, covering the dimple and most of the rivet head. The rivet is checked fo proper seating in the dimple and excess proseal is wiped away. Occasionally we had to use the rivet gun to lightly tap a rivet into its final resting place in the dimple, but most of them inserted right into the hole with no problem. You use your finger pressure to ensure that the rivet is as far down in the dimple as possible. Then the gun is placed on the rivet head and the bucking process commences. Afterward, you get a result that looks like this on the manufactured side of the rivet:

For leading edge ribs it is easiest to start on the bottom which is flatter, followed by the top. The most challenging rivets to set are always the two most forward rivets, since they are the ones that are formed around the extreme curved edge of the skin. Even setting the gun in the correct position on these rivets is a bit of challenge, since the goal is to place the mushroom flat rivet set at a 90 degree angle to the manufactured head of the rivet. Trying to figure out what 90 degrees is to a curved surface simply by eyeballing it is a bit tricky, but you can generally figure out the angle by looking at it.
Another key detail item concerns using the cradle when riveting the tanks or leading edges. While the manufactured heads were relatively easy for me to reach with the gun while the tank was in the cradle, bucking them is another story. Mike was standing on a small step ladder to allow him to get up high enough to be able to comfortably reach down inside the tank to buck the rivets. With me pushing on the rivet gun to maintain pressure while setting the rivet, Mike also had to push back on the tank with his free hand to keep the tank from sliding out of the cradle. This was a bit of trick, but he had obviously figured out how to manage it very well. Just another in a long line of acrobatic contorsionistic moves that one must make to complete this job properly.
When it came time to do the most forward rivets, we needed to take the tank out of the cradle and lay it down on a blanket on the work bench. The only other option is to raise it up out of the cradle so the nose is high enough to get the rivet gun in there. But by the time you do that, you lose all of the holding power of the cradle, so it essentially becomes useless and is more inthe way than anything at that point.
The black marks around the rivet heads in the above pic are easily cleaned up with acetone, as long as the proseal is still wet. So this has to be done soon after the rivets are set. The last two pics show the completed fuel tank rivets after cleaning off the excess proseal on the exterior:


Note the little black ring around the rivet heads in the above pic. This pic is a bit deceiving since it shows the reflection of the speckels on the epoxy floor, so just ignore that and focus on the flush rivets. This is a sign of a properly sealed rivet head on a fuel tank. I was pleased with the way this turned out. Mike is not using tank dimple dies on his tanks, and while some rivets do sit proud from time to time, all of these rivets that we set seemed to be nice and flush with the skin, so I am now more confused than ever as to the never-ending-debate about using special tank dies or regular dimple dies for the fuel tank dimples. I purchased a set of tank dies long ago, and I am still mulling over if I am going to use them or not.
On a cleanup and shop prep note - you will need lots of rags, paper towels, and most importantly rubber gloves. You need to stage these items in such a way that you can use or shed them when necessary and dawn new ones to keep everything as clean as possible. Proseal is some very sticky stuff, and it has to be when you consider that it must be resilient enough to withstand aviation grade fuel. Tools and clecoes get cleaned up after all the work is done.
Thanks Mike for the opportunity to help out with this. What a great experience. Lots of builders make this one of the 49% of the entire build that can be literally built by someone else, and still qualify as a homebuilt airplane that was "built" by you, as required for issuance of an Experimental Airworthiness Certificate. I plan on doing my own tanks, and being able to get some hands on with another builder helps emmensely with understanding what it takes to do this successfully.
Subscribe to:
Posts (Atom)