So here is my attemp to alleviate some of that:
Step one - take the main spar and - - what is my first rule of airplane building - - right - ALWAYS SECURE THE WORK! This is the main spar tipped upside down along side my work bench with the bottom rib and control horn already riveted in place.It also shows the R710 support bracket that is clecoed into place. I chose this configuration as the best method for securing the work since it gave me the best "all around visibility and access for setting the rivets in this complex area.
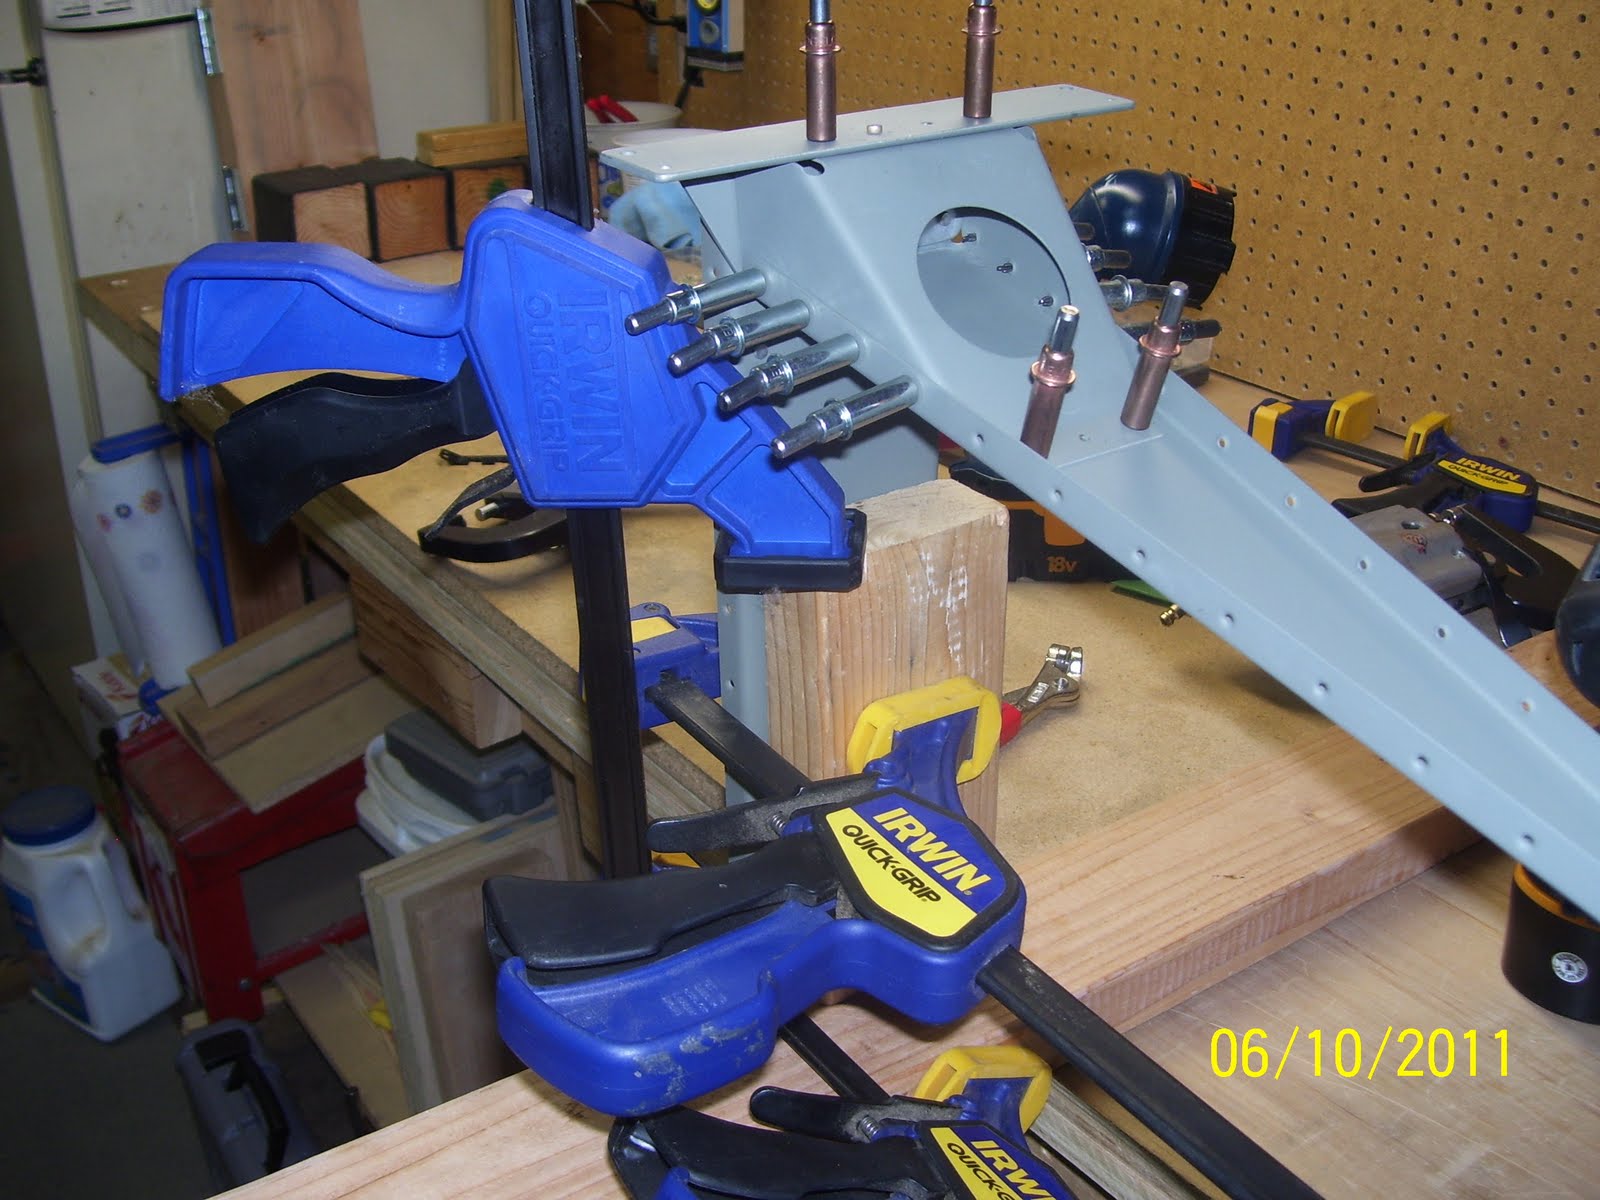
If you have smaller or more mobile work benches than mine, that will be a plus, because you will be able to move the work bench around to more easily position the work. Unfortunately, I had to figure out how to set things up without moving my benches all over the place, since mine are not so mobile. I basically took a spare 2x4 and screwed it down into my work bench, close to the pegboard, to provide a stiff support bracket for positioning the rudder frame. Then I used other combinations of wood to clamp the spar in place so that it would be rigid enough for riveting. You can never have enough clamps.

Tools - so what to use to set the structural rivets for the R710 support bracket? I chose the hand squeezer, a flange yoke, and both a half inch x 3/8 inch flat set and the 1/8 inch cup set for the AN470 rivets. Many posts indicated that the flange yoke and the 1/2 inch flat set are required for this assembly, and they are quite correct. The hand squeezer is lighter and allows more control than the pneumatic squeezer, and the longer flat set is needed because you need an extension to be able to reach the rivets that are inserted above and behind the big round hole in the support bracket.

This is where it gets interesting. A tip I learned from a VAF post a while back is that the rivet call out in the plans essentially provides the direction of insertion of the rivet. The manufactured head (in this case the round head of the rivet) will then be in the proper position against the proper part, and the rivet shaft will also be in the proper position for bucking the shop head. The general rule is to place the manufactured head against the thinner piece of metal, and set the shop head of the rivet against the thicker piece, to prevent curling or gapping the thinner metal. Otherwise, follow the plans.
So what I found in many different posts covering this assembly is that many people are putting the first four rivets with the manufactured heads out, or against the R710 bracket, but the ones that are following directions correctly by placing the round head underneath, so that the shop head is visible and can be easily checked to ensure that it was set correctly. So how then, you may ask, does one insert the rivet up underneath the bracket and into the hole? You cannot see the hole since it is hidden behind the bracket, so it is an entirely blind process. I found it "interesting" that nobody seems to comment about this. So, my solution, after thinking about it a bit, is shown below - I reverse-wrapped a piece of masking tape to the top of my finger (sticky side out) and then stuck the round head of the rivet on the tape as shown, I then I slid my finger into the large access hole in the bracket, and positioned the rivet until it could be pushed through the hole. Then I simply removed the tape. The rivet, although inserted upside down, still managed to stay in place rather nicely due to the close tolerance of the drilled hole and the rivet shaft.

And here is the rivet after being inserted upside down into the hole. This, by the way follows the general rule mentioned previously (manufactured head is against the thinner metal) and also complies with the rivet callout in the plans from Vans. So all you other folks that are doing it differently - -you are doing it WRONG! Notice that I started with the two center rivets, setting them one at a time with the hand squeezer, which is another tricky procedure.......

Riveting in progress. This is a similar pic to those from other builders in many other posts. What is not ever mentioned or shown is just how difficult it is to get the yoke into the proper position to insert it inside the support bracket, and then make certain that the cup set is sitting squarily on the round rivet head, which is all hidden from view. Several tips listed here to hopeflly benefit other builders that will visit this site...
1. Before inserting any rivets into the parts, setup your squeezer by taking a rivet and adjusting the set-depth to the correct level. You want at least enough depth to initially set the rivet to hold it in place, and not so much that you risk over driving the rivet. I always start small here and gradually increase the set depth after I see what is happening to the shop head of the rivet. I may do this 2 or three times until the rivet is correctly set.
2. remove the center clecoes, and when inserting the other end of the yoke into the hole, do it straight on from the center, but at an angle as necessary that follows the contour of the support bracket, if that makes sense. It is a tight fit regardless, but it can be done.
3. When squeezing, make certain that the flat set is positioned as close to the center of the rivet shaft as possible, and that the squeezer is held as straight up and down as possible, so that it is perpendicular to the surface being riveted. This will ensure that the cup set will slide into the correct position over the hidden round head of the rivet, even though you cannot see it. The access hole will provide just enough clearance to set the rivet without bending the bracket as the squeezer is actuated.
If you do these 3 things, then the rivet will be set correctly on both ends.

And this is me playing Airworthiness inspector with my little mirror so that I can peak up underneath the support bracket to inspect the round heads of the four rivets that I just set. That little mirror can be manipulated to inspect all sorts of things, especially when used by somebody that knows how to use it. I mainly wanted to see that all the underside rivet heads were sitting flush against the metal, and that they were not deformed in any way. All of them looked fantastic.

And here are the other three rivets on the back side of the bracket that attach to the rib. Much easier to get to and to set these rivets. Now that the structural rivets are set, only the flush rivets on both sides of the support bracket remain. These are not set until the skins are attached to the frame, so don't make that mistake either! Just remember to take your time through this entire process. Next I riveted the tip rib to the main spar.

No comments:
Post a Comment